注意
点击 这里 下载完整示例代码
StreamWriter 基本用法¶
作者: Moto Hira
本教程展示了如何使用 torchaudio.io.StreamWriter 来
对音频/视频数据进行编码并保存到各种格式/目标位置。
注意
本教程需要 torchaudio 每日构建版本以及 FFmpeg 库(>=4.1,<4.4)。
要安装 Torchaudio 的每日构建版本,请参考 https://pytorch.org/get-started/locally/ 。
有多种方法可以安装 FFmpeg 库。
如果您使用的是 Anaconda Python 发行版,
conda install 'ffmpeg<4.4' 将安装所需的 FFmpeg 库。
警告
TorchAudio 动态加载系统中安装的兼容 FFmpeg 库。 支持的格式类型(媒体格式、编码器、编码器选项等)取决于这些库。
要检查可用的复用器和编码器,可以使用以下命令
ffmpeg -muxers
ffmpeg -encoders
准备¶
import torch
import torchaudio

print(torch.__version__)
print(torchaudio.__version__)
2.0.0
2.0.1
try:
    from torchaudio.io import StreamWriter
except ImportError:
    try:
        import google.colab

        print(
            """
            To enable running this notebook in Google Colab, install nightly
            torch and torchaudio builds by adding the following code block to the top
            of the notebook before running it:
            !pip3 uninstall -y torch torchvision torchaudio
            !pip3 install --pre torch torchvision torchaudio --extra-index-url https://download.pytorch.org/whl/nightly/cpu
            """
        )
    except ModuleNotFoundError:
        pass
    raise

print("FFmpeg library versions")
for k, v in torchaudio.utils.ffmpeg_utils.get_versions().items():
    print(f"  {k}: {v}")
FFmpeg library versions
  libavutil: (56, 31, 100)
  libavcodec: (58, 54, 100)
  libavformat: (58, 29, 100)
  libavfilter: (7, 57, 100)
  libavdevice: (58, 8, 100)
import io
import os
import tempfile

from torchaudio.utils import download_asset
from IPython.display import Audio, Video

SAMPLE_PATH = download_asset("tutorial-assets/Lab41-SRI-VOiCES-src-sp0307-ch127535-sg0042.wav")
WAVEFORM, SAMPLE_RATE = torchaudio.load(SAMPLE_PATH, channels_first=False)
NUM_FRAMES, NUM_CHANNELS = WAVEFORM.shape

_BASE_DIR = tempfile.TemporaryDirectory()


def get_path(filename):
    return os.path.join(_BASE_DIR.name, filename)
基本用法¶
要使用 StreamWriter 将 Tensor 数据保存为媒体格式,有三个必要的步骤
指定输出
配置流
写入数据
以下代码演示了如何将音频数据保存为 WAV 文件。
# 2. Configure the stream. (8kHz, Stereo WAV)
s.add_audio_stream(
    sample_rate=SAMPLE_RATE,
    num_channels=NUM_CHANNELS,
)
# 3. Write the data
with s.open():
    s.write_audio_chunk(0, WAVEFORM)
Audio(path)
现在我们更详细地了解每一步。
写入目标¶
StreamWriter 支持不同类型的写入目标
本地文件
类似文件的对象
流式协议(如 RTMP 和 UDP)
媒体设备(扬声器和视频播放器)†
对于媒体设备,请参阅 StreamWriter 高级用法。
本地文件¶
StreamWriter 支持将媒体保存到本地文件。
StreamWriter(dst="audio.wav")

StreamWriter(dst="audio.mp3")
这同样适用于静态图像和视频。
StreamWriter(dst="image.jpeg")

StreamWriter(dst="video.mpeg")
类似文件的对象¶
你也可以传递一个文件样对象。文件样对象必须实现
write 方法,符合 io.RawIOBase.write 的规范。
# Open the local file as fileobj
with open("audio.wav", "wb") as dst:
    StreamWriter(dst=dst)
# In-memory encoding
buffer = io.BytesIO()
StreamWriter(dst=buffer)
流式协议¶
你可以使用流媒体协议来播放媒体
# Real-Time Messaging Protocol
StreamWriter(dst="rtmp://localhost:1234/live/app", format="flv")

# UDP
StreamWriter(dst="udp://localhost:48550", format="mpegts")
配置输出流¶
一旦指定了目标,下一步就是配置流。 对于典型的音频和静态图像情况,只需要一个流, 但对于带有音频的视频,至少需要配置两个流(一个用于音频,另一个用于视频)。
音频流¶
可以通过
add_audio_stream() 方法添加音频流。
对于编写常规音频文件,至少需要 sample_rate 和 num_channels。
s = StreamWriter("audio.wav")
s.add_audio_stream(sample_rate=8000, num_channels=2)
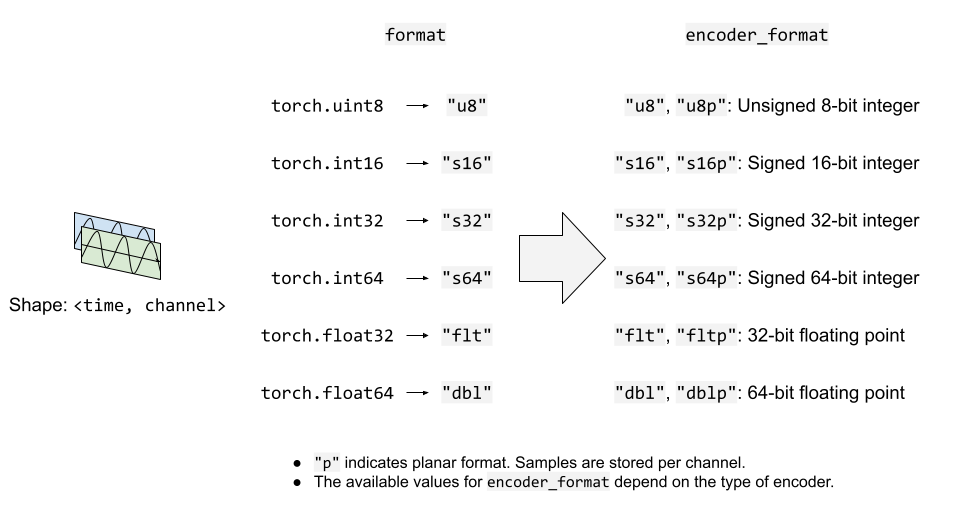
默认情况下,音频流期望输入波形张量为 torch.float32 类型。
如果上述情况,数据将被编码为 WAV 格式的默认编码格式,
即 16 位带符号整数线性 PCM。StreamWriter 会内部转换采样格式。
如果编码器支持多种采样格式,并且您想要更改编码器的采样格式,
您可以使用 encoder_format 选项。
在以下示例中,StreamWriter 期望输入波形 Tensor 的数据类型为 torch.float32,但在编码时会将其转换为 16 位有符号整数。
s = StreamWriter("audio.mp3")
s.add_audio_stream(
    ...,
    encoder="libmp3lame",   # "libmp3lame" is often the default encoder for mp3,
                            # but specifying it manually, for the sake of illustration.

    encoder_format="s16p",  # "libmp3lame" encoder supports the following sample format.
                            #  - "s16p" (16-bit signed integer)
                            #  - "s32p" (32-bit signed integer)
                            #  - "fltp" (32-bit floating point)
)
如果波形 Tensor 的数据类型不是 torch.float32,
你可以提供 format 选项来更改预期的数据类型。
以下示例配置 StreamWriter 以期待类型为 torch.int16 的 Tensor。
# Audio data passed to StreamWriter must be torch.int16
s.add_audio_stream(..., format="s16")
下图说明了 format 和 encoder_format 选项如何用于音频流。
视频流¶
要添加静态图像或视频流,您可以使用
add_video_stream() 种方法。
At minimum, frame_rate, height and width are required.
s = StreamWriter("video.mp4")
s.add_video_stream(frame_rate=10, height=96, width=128)
对于静态图像,请使用 frame_rate=1。
s = StreamWriter("image.png")
s.add_video_stream(frame_rate=1, ...)
与音频流类似,你可以提供 format 和 encoder_format
选项来控制输入数据格式和编码方式。
以下示例对YUV422格式的视频数据进行编码。
s = StreamWriter("video.mov")
s.add_video_stream(
    ...,
    encoder="libx264",  # libx264 supports different YUV formats, such as
                        # yuv420p yuvj420p yuv422p yuvj422p yuv444p yuvj444p nv12 nv16 nv21

    encoder_format="yuv422p",  # StreamWriter will convert the input data to YUV422 internally
)
YUV格式常用于视频编码。许多YUV格式的色度通道平面尺寸与亮度通道不同。这使得很难直接将其表示为torch.Tensor类型。
因此,StreamWriter会自动将输入的视频Tensor转换为目标格式。
StreamWriter 期望输入的图像张量是 4-D (time, channel, height, width)
和 torch.uint8 类型。
默认的颜色通道是RGB。即三个颜色通道分别对应红色、绿色和蓝色。
如果你的输入具有不同的颜色通道,例如BGR和YUV,你可以通过
format 选项来指定它。
以下示例指定了 BGR 格式。
s.add_video_stream(..., format="bgr24")
                   # Image data passed to StreamWriter must have
                   # three color channels representing Blue Green Red.
                   #
                   # The shape of the input tensor has to be
                   # (time, channel==3, height, width)
下图说明了format和encoder_format选项在视频流中的工作方式。

写入数据¶
一旦流配置完成,下一步就是打开输出位置并开始写入数据。
使用 open() 方法打开目标,然后使用 write_audio_chunk()
和/或 write_video_chunk() 写入数据。
音频张量的形状应为 (time, channels), 视频/图像张量的形状应为 (time, channels, height, width)。
通道、高度和宽度必须与相应流的配置匹配,该配置通过 "format" 选项指定。
表示静态图像的张量在时间维度上只能有一个帧, 但音频和视频张量在时间维度上可以有任意数量的帧。
以下代码片段说明了这一点;
Ex) 音频¶
# Configure stream
s = StreamWriter(dst=get_path("audio.wav"))
s.add_audio_stream(sample_rate=SAMPLE_RATE, num_channels=NUM_CHANNELS)

# Write data
with s.open():
    s.write_audio_chunk(0, WAVEFORM)
Ex) 图像¶
# Image config
height = 96
width = 128

# Configure stream
s = StreamWriter(dst=get_path("image.png"))
s.add_video_stream(frame_rate=1, height=height, width=width, format="rgb24")

# Generate image
chunk = torch.randint(256, (1, 3, height, width), dtype=torch.uint8)

# Write data
with s.open():
    s.write_video_chunk(0, chunk)
示例) 无音频的视频¶
# Video config
frame_rate = 30
height = 96
width = 128

# Configure stream
s = StreamWriter(dst=get_path("video.mp4"))
s.add_video_stream(frame_rate=frame_rate, height=height, width=width, format="rgb24")

# Generate video chunk (3 seconds)
time = int(frame_rate * 3)
chunk = torch.randint(256, (time, 3, height, width), dtype=torch.uint8)

# Write data
with s.open():
    s.write_video_chunk(0, chunk)
示例) 带音频的视频¶
要编写包含音频的视频,必须配置独立的流。
# Configure stream
s = StreamWriter(dst=get_path("video.mp4"))
s.add_audio_stream(sample_rate=SAMPLE_RATE, num_channels=NUM_CHANNELS)
s.add_video_stream(frame_rate=frame_rate, height=height, width=width, format="rgb24")

# Generate audio/video chunk (3 seconds)
time = int(SAMPLE_RATE * 3)
audio_chunk = torch.randn((time, NUM_CHANNELS))
time = int(frame_rate * 3)
video_chunk = torch.randint(256, (time, 3, height, width), dtype=torch.uint8)

# Write data
with s.open():
    s.write_audio_chunk(0, audio_chunk)
    s.write_video_chunk(1, video_chunk)
按块写入数据¶
在写入数据时,可以沿着时间维度拆分数据,并以较小的数据块进行写入。
# Write data in one-go
dst1 = io.BytesIO()
s = StreamWriter(dst=dst1, format="mp3")
s.add_audio_stream(SAMPLE_RATE, NUM_CHANNELS)
with s.open():
    s.write_audio_chunk(0, WAVEFORM)
# Write data in smaller chunks
dst2 = io.BytesIO()
s = StreamWriter(dst=dst2, format="mp3")
s.add_audio_stream(SAMPLE_RATE, NUM_CHANNELS)
with s.open():
    for start in range(0, NUM_FRAMES, SAMPLE_RATE):
        end = start + SAMPLE_RATE
        s.write_audio_chunk(0, WAVEFORM[start:end, ...])
bytes1: 10701
b'ID3\x04\x00\x00\x00\x00\x00#'...b'\xaa\xaa\xaa\xaa\xaa\xaa\xaa\xaa\xaa\xaa'

bytes2: 10701
b'ID3\x04\x00\x00\x00\x00\x00#'...b'\xaa\xaa\xaa\xaa\xaa\xaa\xaa\xaa\xaa\xaa'
关于切片和AAC的说明¶
警告
FFmpeg 的原生 AAC 编码器(在保存 MP4 格式视频时默认使用)存在一个影响音频可听性的错误。
请参阅下方的示例。
def test_slice(audio_encoder, slice_size, ext="mp4"):
    path = get_path(f"slice_{slice_size}.{ext}")

    s = StreamWriter(dst=path)
    s.add_audio_stream(SAMPLE_RATE, NUM_CHANNELS, encoder=audio_encoder)
    with s.open():
        for start in range(0, NUM_FRAMES, slice_size):
            end = start + slice_size
            s.write_audio_chunk(0, WAVEFORM[start:end, ...])
    return path
这会导致一些伪影。
# note:
# Chrome does not support playing AAC audio directly while Safari does.
# Using MP4 container and specifying AAC allows Chrome to play it.
Video(test_slice(audio_encoder="aac", slice_size=8000, ext="mp4"), embed=True)
在使用较小的切片时,这一现象更为明显。
Video(test_slice(audio_encoder="aac", slice_size=512, ext="mp4"), embed=True)
Lame MP3 编码器在相同的切片大小下工作正常。
Audio(test_slice(audio_encoder="libmp3lame", slice_size=512, ext="mp3"))
示例 - 谱可视化器¶
在本节中,我们使用 StreamWriter 创建音频的频谱可视化效果,并将其保存为视频文件。
要创建频谱可视化,我们使用
torchaudio.transforms.Spectrogram,以获取音频的频谱表示,
生成其可视化的光栅图像,使用 matplotplib,然后使用 StreamWriter 将其转换为带有原始音频的视频。
import torchaudio.transforms as T
import matplotlib.pyplot as plt
准备数据¶
首先,我们准备频谱图数据。
我们使用 Spectrogram。
我们调整 hop_length 使得频谱图的一帧对应于视频的一帧。
frame_rate = 20
n_fft = 4000

trans = T.Spectrogram(
    n_fft=n_fft,
    hop_length=SAMPLE_RATE // frame_rate,  # One FFT per one video frame
    normalized=True,
    power=1,
)
specs = trans(WAVEFORM.T)[0].T
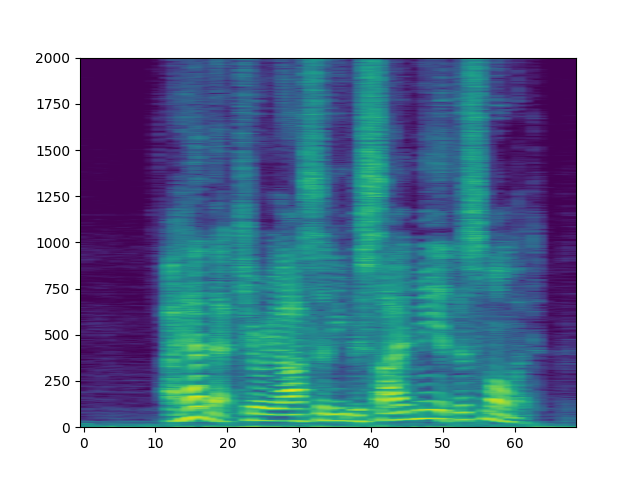
生成的频谱图如下所示。
spec_db = T.AmplitudeToDB(stype="magnitude", top_db=80)(specs.T)
_ = plt.imshow(spec_db, aspect="auto", origin='lower')
准备画布¶
我们使用 matplotlib 来可视化每帧的频谱图。
我们创建一个辅助函数来绘制频谱图数据并
生成图像的光栅化表示。
fig, ax = plt.subplots(figsize=[3.2, 2.4])
ax.set_position([0, 0, 1, 1])
ax.set_facecolor("black")
ncols, nrows = fig.canvas.get_width_height()


def _plot(data):
    ax.clear()
    x = list(range(len(data)))
    R, G, B = 238/255, 76/255, 44/255
    for coeff, alpha in [(0.8, 0.7), (1, 1)]:
        d = data ** coeff
        ax.fill_between(x, d, -d, color=[R, G, B, alpha])
    xlim = n_fft // 2 + 1
    ax.set_xlim([-1, n_fft // 2 + 1])
    ax.set_ylim([-1, 1])
    ax.text(
        xlim, 0.95,
        f"Created with TorchAudio\n{torchaudio.__version__}",
        color="white", ha="right", va="top", backgroundcolor="black")
    fig.canvas.draw()
    frame = torch.frombuffer(fig.canvas.tostring_rgb(), dtype=torch.uint8)
    return frame.reshape(nrows, ncols, 3).permute(2, 0, 1)

# sphinx_gallery_defer_figures
撰写视频¶
最后,我们使用 StreamWriter 并写入视频。 我们一次处理一秒的音频和视频帧。
s = StreamWriter(get_path("example.mp4"))
s.add_audio_stream(sample_rate=SAMPLE_RATE, num_channels=NUM_CHANNELS)
s.add_video_stream(frame_rate=frame_rate, height=nrows, width=ncols)

with s.open():
    i = 0
    # Process by second
    for t in range(0, NUM_FRAMES, SAMPLE_RATE):
        # Write audio chunk
        s.write_audio_chunk(0, WAVEFORM[t:t + SAMPLE_RATE, :])

        # write 1 second of video chunk
        frames = [_plot(spec) for spec in specs[i:i+frame_rate]]
        if frames:
            s.write_video_chunk(1, torch.stack(frames))
        i += frame_rate

plt.close(fig)
/root/project/examples/tutorials/streamwriter_basic_tutorial.py:626: UserWarning: The given buffer is not writable, and PyTorch does not support non-writable tensors. This means you can write to the underlying (supposedly non-writable) buffer using the tensor. You may want to copy the buffer to protect its data or make it writable before converting it to a tensor. This type of warning will be suppressed for the rest of this program. (Triggered internally at /opt/conda/conda-bld/pytorch_1678402379298/work/torch/csrc/utils/tensor_new.cpp:1462.)
  frame = torch.frombuffer(fig.canvas.tostring_rgb(), dtype=torch.uint8)
结果¶
结果如下所示。
Video(get_path("example.mp4"), embed=True)
仔细观看视频,可以观察到“s”音(curiosity,besides,this)的高频部分(视频右侧)分配了更多能量。
Tag: torchaudio.io
脚本的总运行时间: ( 0 分钟 8.092 秒)