注意
点击 这里 下载完整示例代码
StreamWriter 基本用法¶
作者: Moto Hira
本教程展示了如何使用 torchaudio.io.StreamWriter 来
对音频/视频数据进行编码并保存到各种格式/目标位置。
注意
本教程需要FFmpeg库。 请参阅 FFmpeg依赖项 以获取详细信息。
警告
TorchAudio 动态加载系统中安装的兼容 FFmpeg 库。 支持的格式类型(媒体格式、编码器、编码器选项等)取决于这些库。
要检查可用的复用器和编码器,可以使用以下命令
ffmpeg -muxers
ffmpeg -encoders
准备¶
import torch
import torchaudio

print(torch.__version__)
print(torchaudio.__version__)

from torchaudio.io import StreamWriter

print("FFmpeg library versions")
for k, v in torchaudio.utils.ffmpeg_utils.get_versions().items():
    print(f"  {k}: {v}")
2.4.0
2.4.0
FFmpeg library versions
  libavcodec: (60, 3, 100)
  libavdevice: (60, 1, 100)
  libavfilter: (9, 3, 100)
  libavformat: (60, 3, 100)
  libavutil: (58, 2, 100)
import io
import os
import tempfile

from IPython.display import Audio, Video

from torchaudio.utils import download_asset

SAMPLE_PATH = download_asset("tutorial-assets/Lab41-SRI-VOiCES-src-sp0307-ch127535-sg0042.wav")
WAVEFORM, SAMPLE_RATE = torchaudio.load(SAMPLE_PATH, channels_first=False)
NUM_FRAMES, NUM_CHANNELS = WAVEFORM.shape

_BASE_DIR = tempfile.TemporaryDirectory()


def get_path(filename):
    return os.path.join(_BASE_DIR.name, filename)
基本用法¶
要使用 StreamWriter 将 Tensor 数据保存为媒体格式,有三个必要的步骤
指定输出
配置流
写入数据
以下代码演示了如何将音频数据保存为 WAV 文件。
# 2. Configure the stream. (8kHz, Stereo WAV)
s.add_audio_stream(
    sample_rate=SAMPLE_RATE,
    num_channels=NUM_CHANNELS,
)
# 3. Write the data
with s.open():
    s.write_audio_chunk(0, WAVEFORM)
Audio(path)
现在我们更详细地了解每一步。
写入目标¶
StreamWriter 支持不同类型的写入目标
本地文件
类似文件的对象
流式协议(如 RTMP 和 UDP)
媒体设备(扬声器和视频播放器)†
对于媒体设备,请参阅 StreamWriter 高级用法。
本地文件¶
StreamWriter 支持将媒体保存到本地文件。
StreamWriter(dst="audio.wav")

StreamWriter(dst="audio.mp3")
这同样适用于静态图像和视频。
StreamWriter(dst="image.jpeg")

StreamWriter(dst="video.mpeg")
类似文件的对象¶
你也可以传递一个文件样对象。文件样对象必须实现
write 方法,符合 io.RawIOBase.write 的规范。
# Open the local file as fileobj
with open("audio.wav", "wb") as dst:
    StreamWriter(dst=dst)
# In-memory encoding
buffer = io.BytesIO()
StreamWriter(dst=buffer)
流式协议¶
你可以使用流媒体协议来播放媒体
# Real-Time Messaging Protocol
StreamWriter(dst="rtmp://localhost:1234/live/app", format="flv")

# UDP
StreamWriter(dst="udp://localhost:48550", format="mpegts")
配置输出流¶
一旦指定了目标,下一步就是配置流。 对于典型的音频和静态图像情况,只需要一个流, 但对于带有音频的视频,至少需要配置两个流(一个用于音频,另一个用于视频)。
音频流¶
可通过
add_audio_stream() 种方法添加音频流。
对于编写常规音频文件,至少需要 sample_rate 和 num_channels。
s = StreamWriter("audio.wav")
s.add_audio_stream(sample_rate=8000, num_channels=2)
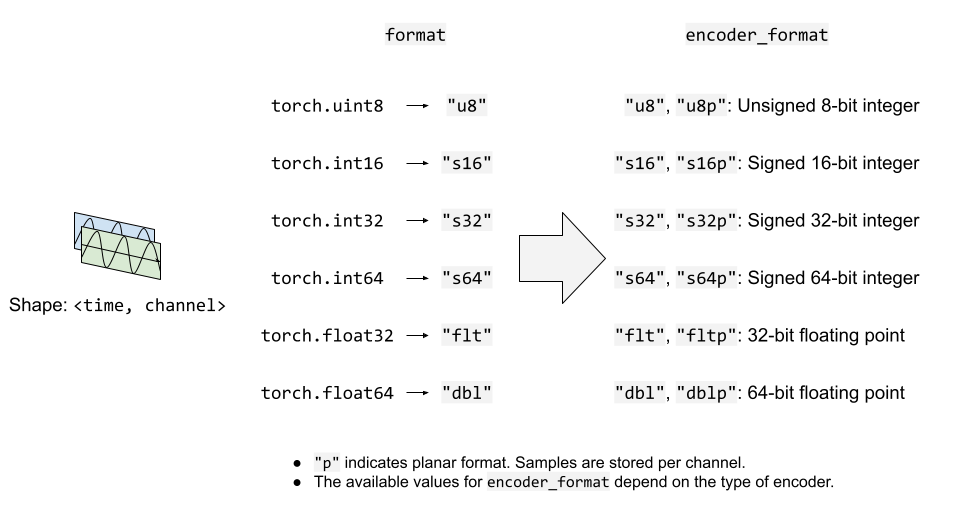
默认情况下,音频流期望输入波形张量为 torch.float32 类型。
如果上述情况,数据将被编码为 WAV 格式的默认编码格式,
即 16 位带符号整数线性 PCM。StreamWriter 会内部转换采样格式。
如果编码器支持多种采样格式,并且您想要更改编码器的采样格式,
您可以使用 encoder_format 选项。
在以下示例中,StreamWriter 期望输入波形 Tensor 的数据类型为 torch.float32,但在编码时会将其转换为 16 位有符号整数。
s = StreamWriter("audio.mp3")
s.add_audio_stream(
    ...,
    encoder="libmp3lame",   # "libmp3lame" is often the default encoder for mp3,
                            # but specifying it manually, for the sake of illustration.

    encoder_format="s16p",  # "libmp3lame" encoder supports the following sample format.
                            #  - "s16p" (16-bit signed integer)
                            #  - "s32p" (32-bit signed integer)
                            #  - "fltp" (32-bit floating point)
)
如果波形 Tensor 的数据类型不是 torch.float32,
你可以提供 format 选项来更改预期的数据类型。
以下示例配置 StreamWriter 以期待类型为 torch.int16 的 Tensor。
# Audio data passed to StreamWriter must be torch.int16
s.add_audio_stream(..., format="s16")
下图说明了 format 和 encoder_format 选项如何用于音频流。
视频流¶
要添加静态图像或视频流,可以使用
add_video_stream() 种方法。
At minimum, frame_rate, height and width are required.
s = StreamWriter("video.mp4")
s.add_video_stream(frame_rate=10, height=96, width=128)
对于静态图像,请使用 frame_rate=1。
s = StreamWriter("image.png")
s.add_video_stream(frame_rate=1, ...)
与音频流类似,你可以提供 format 和 encoder_format
选项来控制输入数据格式和编码方式。
以下示例对YUV422格式的视频数据进行编码。
s = StreamWriter("video.mov")
s.add_video_stream(
    ...,
    encoder="libx264",  # libx264 supports different YUV formats, such as
                        # yuv420p yuvj420p yuv422p yuvj422p yuv444p yuvj444p nv12 nv16 nv21

    encoder_format="yuv422p",  # StreamWriter will convert the input data to YUV422 internally
)
YUV格式常用于视频编码。许多YUV格式的色度通道平面尺寸与亮度通道不同。这使得很难直接将其表示为torch.Tensor类型。
因此,StreamWriter会自动将输入的视频Tensor转换为目标格式。
StreamWriter 期望输入的图像张量是 4-D (time, channel, height, width)
和 torch.uint8 类型。
默认的颜色通道是RGB。即三个颜色通道分别对应红色、绿色和蓝色。
如果你的输入具有不同的颜色通道,例如BGR和YUV,你可以通过
format 选项来指定它。
以下示例指定了 BGR 格式。
s.add_video_stream(..., format="bgr24")
                   # Image data passed to StreamWriter must have
                   # three color channels representing Blue Green Red.
                   #
                   # The shape of the input tensor has to be
                   # (time, channel==3, height, width)
下图说明了format和encoder_format选项在视频流中的工作方式。

写入数据¶
一旦流配置完成,下一步就是打开输出位置并开始写入数据。
使用 open() 方法打开目标,然后使用 write_audio_chunk()
和/或 write_video_chunk() 写入数据。
音频张量的形状应为 (time, channels), 视频/图像张量的形状应为 (time, channels, height, width)。
通道、高度和宽度必须与相应流的配置匹配,该配置通过 "format" 选项指定。
表示静态图像的张量在时间维度上只能有一个帧, 但音频和视频张量在时间维度上可以有任意数量的帧。
以下代码片段说明了这一点;
Ex) 音频¶
# Configure stream
s = StreamWriter(dst=get_path("audio.wav"))
s.add_audio_stream(sample_rate=SAMPLE_RATE, num_channels=NUM_CHANNELS)

# Write data
with s.open():
    s.write_audio_chunk(0, WAVEFORM)
Ex) 图像¶
# Image config
height = 96
width = 128

# Configure stream
s = StreamWriter(dst=get_path("image.png"))
s.add_video_stream(frame_rate=1, height=height, width=width, format="rgb24")

# Generate image
chunk = torch.randint(256, (1, 3, height, width), dtype=torch.uint8)

# Write data
with s.open():
    s.write_video_chunk(0, chunk)
示例) 无音频的视频¶
# Video config
frame_rate = 30
height = 96
width = 128

# Configure stream
s = StreamWriter(dst=get_path("video.mp4"))
s.add_video_stream(frame_rate=frame_rate, height=height, width=width, format="rgb24")

# Generate video chunk (3 seconds)
time = int(frame_rate * 3)
chunk = torch.randint(256, (time, 3, height, width), dtype=torch.uint8)

# Write data
with s.open():
    s.write_video_chunk(0, chunk)
示例) 带音频的视频¶
要编写包含音频的视频,必须配置独立的流。
# Configure stream
s = StreamWriter(dst=get_path("video.mp4"))
s.add_audio_stream(sample_rate=SAMPLE_RATE, num_channels=NUM_CHANNELS)
s.add_video_stream(frame_rate=frame_rate, height=height, width=width, format="rgb24")

# Generate audio/video chunk (3 seconds)
time = int(SAMPLE_RATE * 3)
audio_chunk = torch.randn((time, NUM_CHANNELS))
time = int(frame_rate * 3)
video_chunk = torch.randint(256, (time, 3, height, width), dtype=torch.uint8)

# Write data
with s.open():
    s.write_audio_chunk(0, audio_chunk)
    s.write_video_chunk(1, video_chunk)
按块写入数据¶
在写入数据时,可以沿着时间维度拆分数据,并以较小的数据块进行写入。
# Write data in one-go
dst1 = io.BytesIO()
s = StreamWriter(dst=dst1, format="mp3")
s.add_audio_stream(SAMPLE_RATE, NUM_CHANNELS)
with s.open():
    s.write_audio_chunk(0, WAVEFORM)
# Write data in smaller chunks
dst2 = io.BytesIO()
s = StreamWriter(dst=dst2, format="mp3")
s.add_audio_stream(SAMPLE_RATE, NUM_CHANNELS)
with s.open():
    for start in range(0, NUM_FRAMES, SAMPLE_RATE):
        end = start + SAMPLE_RATE
        s.write_audio_chunk(0, WAVEFORM[start:end, ...])
# Check that the contents are same
dst1.seek(0)
bytes1 = dst1.read()

print(f"bytes1: {len(bytes1)}")
print(f"{bytes1[:10]}...{bytes1[-10:]}\n")

dst2.seek(0)
bytes2 = dst2.read()

print(f"bytes2: {len(bytes2)}")
print(f"{bytes2[:10]}...{bytes2[-10:]}\n")

assert bytes1 == bytes2

import matplotlib.pyplot as plt
bytes1: 10700
b'ID3\x04\x00\x00\x00\x00\x00"'...b'\xaa\xaa\xaa\xaa\xaa\xaa\xaa\xaa\xaa\xaa'

bytes2: 10700
b'ID3\x04\x00\x00\x00\x00\x00"'...b'\xaa\xaa\xaa\xaa\xaa\xaa\xaa\xaa\xaa\xaa'
示例 - 谱可视化器¶
在本节中,我们使用 StreamWriter 创建音频的频谱可视化效果,并将其保存为视频文件。
要创建频谱可视化,我们使用
torchaudio.transforms.Spectrogram,以获取音频的频谱表示,
生成其可视化的光栅图像,使用 matplotplib,然后使用 StreamWriter 将其转换为带有原始音频的视频。
import torchaudio.transforms as T
准备数据¶
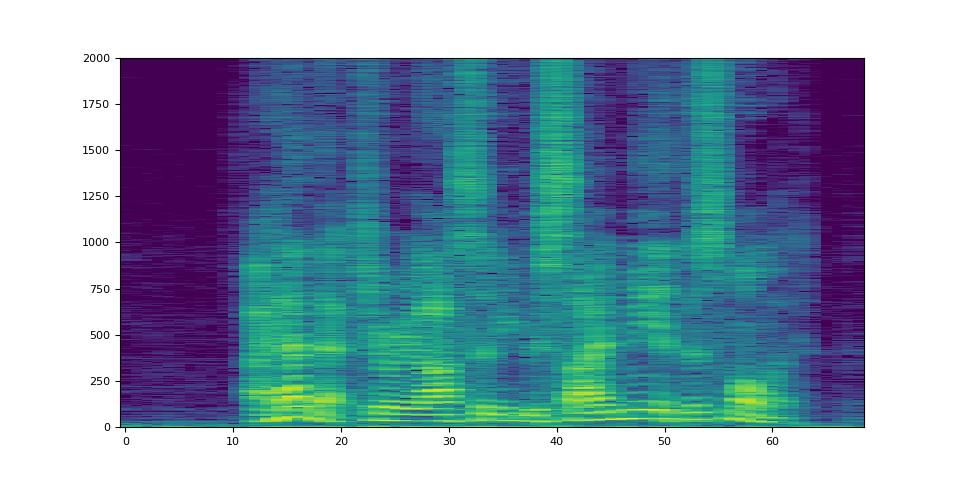
首先,我们准备频谱图数据。
我们使用 Spectrogram。
我们调整 hop_length 使得频谱图的一帧对应于视频的一帧。
frame_rate = 20
n_fft = 4000

trans = T.Spectrogram(
    n_fft=n_fft,
    hop_length=SAMPLE_RATE // frame_rate,  # One FFT per one video frame
    normalized=True,
    power=1,
)
specs = trans(WAVEFORM.T)[0].T
生成的频谱图如下所示。
spec_db = T.AmplitudeToDB(stype="magnitude", top_db=80)(specs.T)
_ = plt.imshow(spec_db, aspect="auto", origin="lower")
准备画布¶
我们使用 matplotlib 来可视化每帧的频谱图。
我们创建一个辅助函数来绘制频谱图数据并
生成图像的光栅化表示。
fig, ax = plt.subplots(figsize=[3.2, 2.4])
ax.set_position([0, 0, 1, 1])
ax.set_facecolor("black")
ncols, nrows = fig.canvas.get_width_height()


def _plot(data):
    ax.clear()
    x = list(range(len(data)))
    R, G, B = 238 / 255, 76 / 255, 44 / 255
    for coeff, alpha in [(0.8, 0.7), (1, 1)]:
        d = data**coeff
        ax.fill_between(x, d, -d, color=[R, G, B, alpha])
    xlim = n_fft // 2 + 1
    ax.set_xlim([-1, n_fft // 2 + 1])
    ax.set_ylim([-1, 1])
    ax.text(
        xlim,
        0.95,
        f"Created with TorchAudio\n{torchaudio.__version__}",
        color="white",
        ha="right",
        va="top",
        backgroundcolor="black",
    )
    fig.canvas.draw()
    frame = torch.frombuffer(fig.canvas.tostring_rgb(), dtype=torch.uint8)
    return frame.reshape(nrows, ncols, 3).permute(2, 0, 1)


# sphinx_gallery_defer_figures
撰写视频¶
最后,我们使用 StreamWriter 并写入视频。 我们一次处理一秒的音频和视频帧。
s = StreamWriter(get_path("example.mp4"))
s.add_audio_stream(sample_rate=SAMPLE_RATE, num_channels=NUM_CHANNELS)
s.add_video_stream(frame_rate=frame_rate, height=nrows, width=ncols)

with s.open():
    i = 0
    # Process by second
    for t in range(0, NUM_FRAMES, SAMPLE_RATE):
        # Write audio chunk
        s.write_audio_chunk(0, WAVEFORM[t : t + SAMPLE_RATE, :])

        # write 1 second of video chunk
        frames = [_plot(spec) for spec in specs[i : i + frame_rate]]
        if frames:
            s.write_video_chunk(1, torch.stack(frames))
        i += frame_rate

plt.close(fig)
/pytorch/audio/examples/tutorials/streamwriter_basic_tutorial.py:566: MatplotlibDeprecationWarning: The tostring_rgb function was deprecated in Matplotlib 3.8 and will be removed two minor releases later. Use buffer_rgba instead.
  frame = torch.frombuffer(fig.canvas.tostring_rgb(), dtype=torch.uint8)
/pytorch/audio/examples/tutorials/streamwriter_basic_tutorial.py:566: UserWarning: The given buffer is not writable, and PyTorch does not support non-writable tensors. This means you can write to the underlying (supposedly non-writable) buffer using the tensor. You may want to copy the buffer to protect its data or make it writable before converting it to a tensor. This type of warning will be suppressed for the rest of this program. (Triggered internally at /opt/conda/conda-bld/pytorch_1720538440907/work/torch/csrc/utils/tensor_new.cpp:1544.)
  frame = torch.frombuffer(fig.canvas.tostring_rgb(), dtype=torch.uint8)
结果¶
结果如下所示。
Video(get_path("example.mp4"), embed=True)
仔细观看视频,可以观察到“s”音(curiosity,besides,this)的高频部分(视频右侧)分配了更多能量。
Tag: torchaudio.io
脚本的总运行时间: ( 0 分钟 7.427 秒)