注意
点击 这里 下载完整示例代码
使用 Tacotron2 进行文本转语音
概述
本教程展示了如何使用 torchaudio 中预训练的 Tacotron2 构建文本转语音流程。
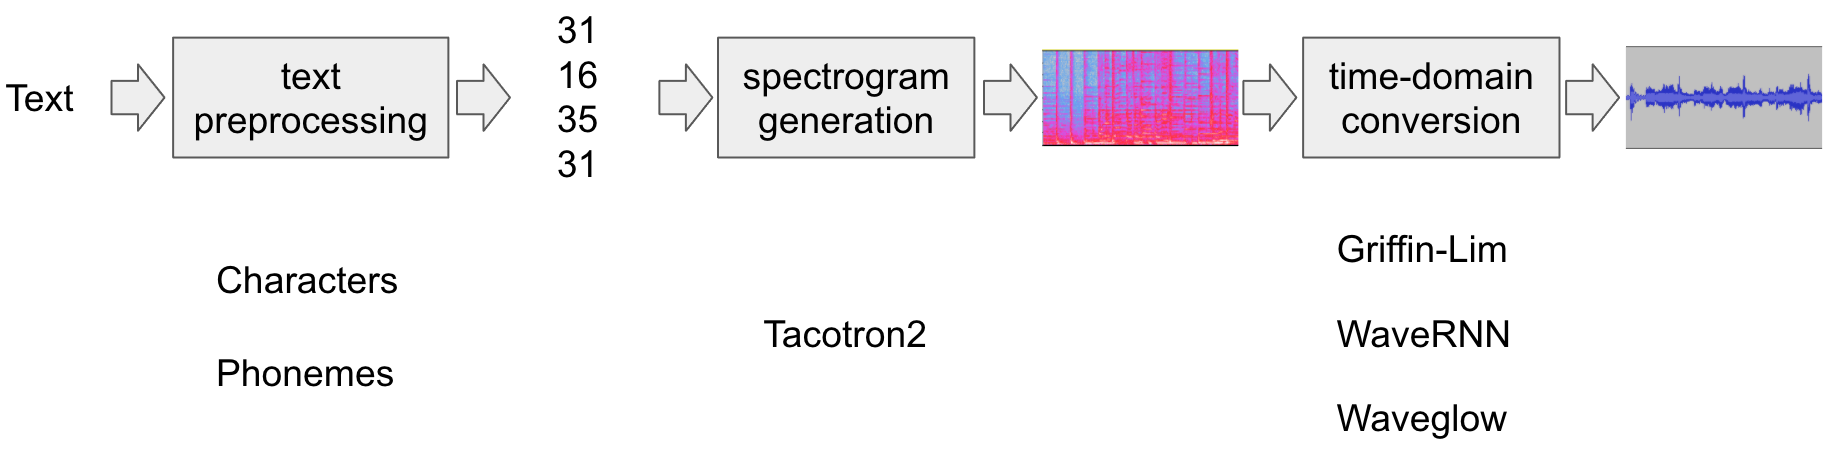
文本转语音流程如下:
文本预处理
首先,输入文本被编码为符号列表。在本教程中,我们将使用英文字符和音素作为符号。
频谱图生成
从编码文本生成频谱图。我们使用
Tacotron2模型来完成此操作。时域转换
最后一步是将频谱图转换为波形。从频谱图生成语音的过程也称为声码器(Vocoder)。在本教程中,使用了三种不同的声码器:
WaveRNN、GriffinLim以及 Nvidia 的 WaveGlow。
下图展示了整个流程。
所有相关组件都打包在 torchaudio.pipelines.Tacotron2TTSBundle 中,
但本教程也将涵盖其背后的处理过程。
准备
首先,我们安装必要的依赖项。除了
torchaudio,还需要 DeepPhonemizer 来执行基于音素的编码。
%%bash
pip3 install deep_phonemizer
import torch
import torchaudio

torch.random.manual_seed(0)
device = "cuda" if torch.cuda.is_available() else "cpu"

print(torch.__version__)
print(torchaudio.__version__)
print(device)
2.4.0
2.4.0
cuda
import IPython
import matplotlib.pyplot as plt
文本处理
基于字符的编码
在本节中,我们将介绍基于字符的编码是如何工作的。
由于预训练的 Tacotron2 模型需要特定的符号表,相同的功能在 torchaudio 中也可用。不过,我们将首先手动实现编码以帮助理解。
首先,我们定义符号集
'_-!\'(),.:;? abcdefghijklmnopqrstuvwxyz'。然后,我们将输入文本的每个字符映射到表中对应符号的索引。不在表中的符号将被忽略。
[19, 16, 23, 23, 26, 11, 34, 26, 29, 23, 15, 2, 11, 31, 16, 35, 31, 11, 31, 26, 11, 30, 27, 16, 16, 14, 19, 2]
如上所述,符号表和索引必须与预训练的 Tacotron2 模型所期望的一致。torchaudio 提供了与预训练模型相同的转换。您可以按以下方式实例化并使用此类转换。
tensor([[19, 16, 23, 23, 26, 11, 34, 26, 29, 23, 15,  2, 11, 31, 16, 35, 31, 11,
         31, 26, 11, 30, 27, 16, 16, 14, 19,  2]])
tensor([28], dtype=torch.int32)
注意:我们手动编码的输出与 torchaudio text_processor 输出相匹配(意味着我们正确地重新实现了库内部的操作)。它接受文本或文本列表作为输入。
当提供文本列表时,返回的 lengths 变量
表示输出批次中每个处理后的令牌的有效长度。
中间表示可按以下方式获取:
['h', 'e', 'l', 'l', 'o', ' ', 'w', 'o', 'r', 'l', 'd', '!', ' ', 't', 'e', 'x', 't', ' ', 't', 'o', ' ', 's', 'p', 'e', 'e', 'c', 'h', '!']
基于音素的编码
基于音素的编码与基于字符的编码类似,但它使用基于音素的符号表和一个 G2P(字形到音素)模型。
G2P 模型的细节超出了本教程的范围,我们只需查看转换后的结果即可。
与基于字符的编码情况类似,编码过程应与预训练的 Tacotron2 模型所训练的内容相匹配。
torchaudio 提供了一个用于创建该过程的接口。
以下代码说明了如何创建和使用该流程。在后台,使用 DeepPhonemizer 包创建一个 G2P 模型,并获取 DeepPhonemizer 的作者发布的预训练权重。
  0%|          | 0.00/63.6M [00:00<?, ?B/s]
  0%|          | 128k/63.6M [00:00<01:32, 721kB/s]
  1%|          | 384k/63.6M [00:00<00:57, 1.14MB/s]
  1%|1         | 768k/63.6M [00:00<00:40, 1.62MB/s]
  2%|1         | 1.25M/63.6M [00:00<00:30, 2.12MB/s]
  3%|2         | 1.75M/63.6M [00:00<00:27, 2.40MB/s]
  4%|3         | 2.38M/63.6M [00:01<00:22, 2.80MB/s]
  5%|4         | 3.00M/63.6M [00:01<00:20, 3.07MB/s]
  6%|5         | 3.75M/63.6M [00:01<00:18, 3.47MB/s]
  7%|7         | 4.50M/63.6M [00:01<00:16, 3.75MB/s]
  8%|8         | 5.38M/63.6M [00:01<00:14, 4.15MB/s]
 10%|#         | 6.38M/63.6M [00:01<00:12, 4.64MB/s]
 12%|#1        | 7.38M/63.6M [00:02<00:11, 5.00MB/s]
 13%|#3        | 8.50M/63.6M [00:02<00:10, 5.47MB/s]
 16%|#5        | 9.88M/63.6M [00:02<00:09, 6.20MB/s]
 18%|#7        | 11.2M/63.6M [00:02<00:08, 6.73MB/s]
 20%|##        | 12.8M/63.6M [00:02<00:07, 7.32MB/s]
 23%|##2       | 14.5M/63.6M [00:03<00:06, 8.14MB/s]
 26%|##5       | 16.4M/63.6M [00:03<00:05, 8.96MB/s]
 29%|##9       | 18.5M/63.6M [00:03<00:04, 9.95MB/s]
 33%|###2      | 20.8M/63.6M [00:03<00:04, 10.9MB/s]
 37%|###6      | 23.4M/63.6M [00:03<00:03, 12.1MB/s]
 41%|####1     | 26.1M/63.6M [00:03<00:02, 13.3MB/s]
 46%|####5     | 29.1M/63.6M [00:04<00:02, 14.7MB/s]
 49%|####8     | 31.0M/63.6M [00:04<00:02, 15.6MB/s]
 54%|#####4    | 34.4M/63.6M [00:04<00:01, 17.0MB/s]
 60%|#####9    | 37.9M/63.6M [00:04<00:01, 21.1MB/s]
 63%|######3   | 40.4M/63.6M [00:04<00:01, 19.2MB/s]
 68%|######7   | 43.2M/63.6M [00:04<00:00, 21.6MB/s]
 74%|#######4  | 47.4M/63.6M [00:04<00:00, 22.8MB/s]
 80%|########  | 51.0M/63.6M [00:05<00:00, 26.2MB/s]
 87%|########7 | 55.5M/63.6M [00:05<00:00, 26.5MB/s]
 94%|#########4| 59.9M/63.6M [00:05<00:00, 30.9MB/s]
100%|##########| 63.6M/63.6M [00:05<00:00, 12.2MB/s]
/pytorch/audio/ci_env/lib/python3.10/site-packages/dp/model/model.py:306: FutureWarning: You are using `torch.load` with `weights_only=False` (the current default value), which uses the default pickle module implicitly. It is possible to construct malicious pickle data which will execute arbitrary code during unpickling (See https://github.com/pytorch/pytorch/blob/main/SECURITY.md#untrusted-models for more details). In a future release, the default value for `weights_only` will be flipped to `True`. This limits the functions that could be executed during unpickling. Arbitrary objects will no longer be allowed to be loaded via this mode unless they are explicitly allowlisted by the user via `torch.serialization.add_safe_globals`. We recommend you start setting `weights_only=True` for any use case where you don't have full control of the loaded file. Please open an issue on GitHub for any issues related to this experimental feature.
  checkpoint = torch.load(checkpoint_path, map_location=device)
/pytorch/audio/ci_env/lib/python3.10/site-packages/torch/nn/modules/transformer.py:307: UserWarning: enable_nested_tensor is True, but self.use_nested_tensor is False because encoder_layer.self_attn.batch_first was not True(use batch_first for better inference performance)
  warnings.warn(f"enable_nested_tensor is True, but self.use_nested_tensor is False because {why_not_sparsity_fast_path}")
tensor([[54, 20, 65, 69, 11, 92, 44, 65, 38,  2, 11, 81, 40, 64, 79, 81, 11, 81,
         20, 11, 79, 77, 59, 37,  2]])
tensor([25], dtype=torch.int32)
请注意,编码后的值与基于字符的编码示例不同。
中间表示形式如下所示。
['HH', 'AH', 'L', 'OW', ' ', 'W', 'ER', 'L', 'D', '!', ' ', 'T', 'EH', 'K', 'S', 'T', ' ', 'T', 'AH', ' ', 'S', 'P', 'IY', 'CH', '!']
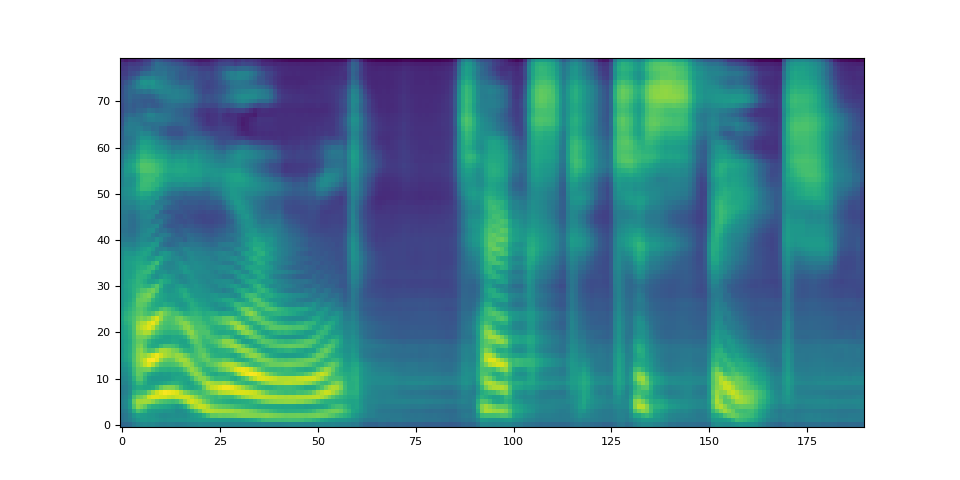
频谱图生成
Tacotron2 是我们用来从编码文本生成频谱图的模型。有关该模型的详细信息,请参阅 论文。
使用预训练权重实例化 Tacotron2 模型非常简单,但请注意,输入到 Tacotron2 模型的数据需要经过匹配文本处理器的处理。
torchaudio.pipelines.Tacotron2TTSBundle 将匹配的模型和处理器捆绑在一起,以便轻松创建流水线。
有关可用的捆绑包及其用法,请参阅
Tacotron2TTSBundle。
bundle = torchaudio.pipelines.TACOTRON2_WAVERNN_PHONE_LJSPEECH
processor = bundle.get_text_processor()
tacotron2 = bundle.get_tacotron2().to(device)

text = "Hello world! Text to speech!"

with torch.inference_mode():
    processed, lengths = processor(text)
    processed = processed.to(device)
    lengths = lengths.to(device)
    spec, _, _ = tacotron2.infer(processed, lengths)


_ = plt.imshow(spec[0].cpu().detach(), origin="lower", aspect="auto")
/pytorch/audio/ci_env/lib/python3.10/site-packages/dp/model/model.py:306: FutureWarning: You are using `torch.load` with `weights_only=False` (the current default value), which uses the default pickle module implicitly. It is possible to construct malicious pickle data which will execute arbitrary code during unpickling (See https://github.com/pytorch/pytorch/blob/main/SECURITY.md#untrusted-models for more details). In a future release, the default value for `weights_only` will be flipped to `True`. This limits the functions that could be executed during unpickling. Arbitrary objects will no longer be allowed to be loaded via this mode unless they are explicitly allowlisted by the user via `torch.serialization.add_safe_globals`. We recommend you start setting `weights_only=True` for any use case where you don't have full control of the loaded file. Please open an issue on GitHub for any issues related to this experimental feature.
  checkpoint = torch.load(checkpoint_path, map_location=device)
/pytorch/audio/ci_env/lib/python3.10/site-packages/torch/nn/modules/transformer.py:307: UserWarning: enable_nested_tensor is True, but self.use_nested_tensor is False because encoder_layer.self_attn.batch_first was not True(use batch_first for better inference performance)
  warnings.warn(f"enable_nested_tensor is True, but self.use_nested_tensor is False because {why_not_sparsity_fast_path}")
Downloading: "https://download.pytorch.org/torchaudio/models/tacotron2_english_phonemes_1500_epochs_wavernn_ljspeech.pth" to /root/.cache/torch/hub/checkpoints/tacotron2_english_phonemes_1500_epochs_wavernn_ljspeech.pth

  0%|          | 0.00/107M [00:00<?, ?B/s]
 15%|#4        | 16.0M/107M [00:00<00:01, 94.6MB/s]
 29%|##8       | 30.9M/107M [00:00<00:00, 103MB/s]
 38%|###8      | 40.9M/107M [00:00<00:00, 89.2MB/s]
 46%|####6     | 49.5M/107M [00:00<00:00, 80.4MB/s]
 60%|#####9    | 64.0M/107M [00:00<00:00, 77.1MB/s]
 74%|#######4  | 80.0M/107M [00:01<00:00, 60.7MB/s]
 89%|########9 | 95.8M/107M [00:01<00:00, 61.3MB/s]
 95%|#########4| 102M/107M [00:01<00:00, 58.7MB/s]
100%|##########| 107M/107M [00:01<00:00, 63.2MB/s]
请注意 Tacotron2.infer 方法执行多项式采样,
因此,生成频谱的过程会引入随机性。
def plot():
    fig, ax = plt.subplots(3, 1)
    for i in range(3):
        with torch.inference_mode():
            spec, spec_lengths, _ = tacotron2.infer(processed, lengths)
        print(spec[0].shape)
        ax[i].imshow(spec[0].cpu().detach(), origin="lower", aspect="auto")


plot()
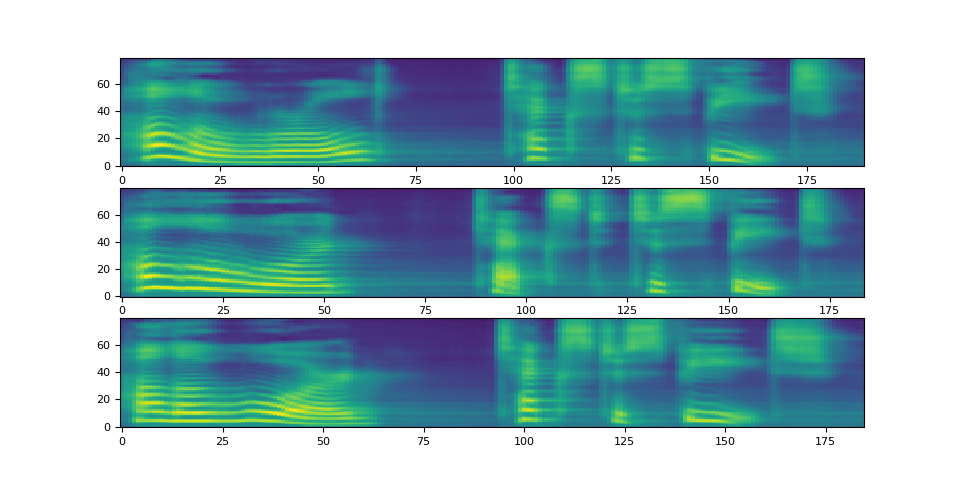
torch.Size([80, 190])
torch.Size([80, 184])
torch.Size([80, 185])
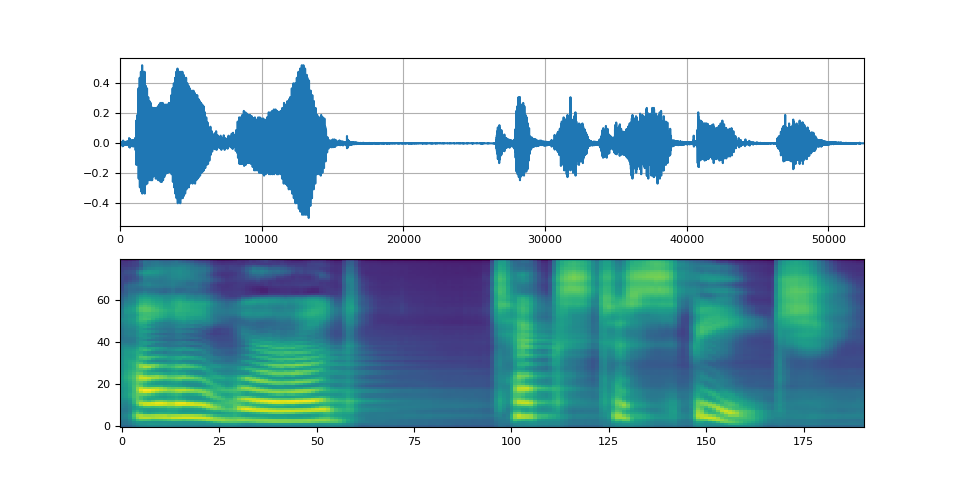
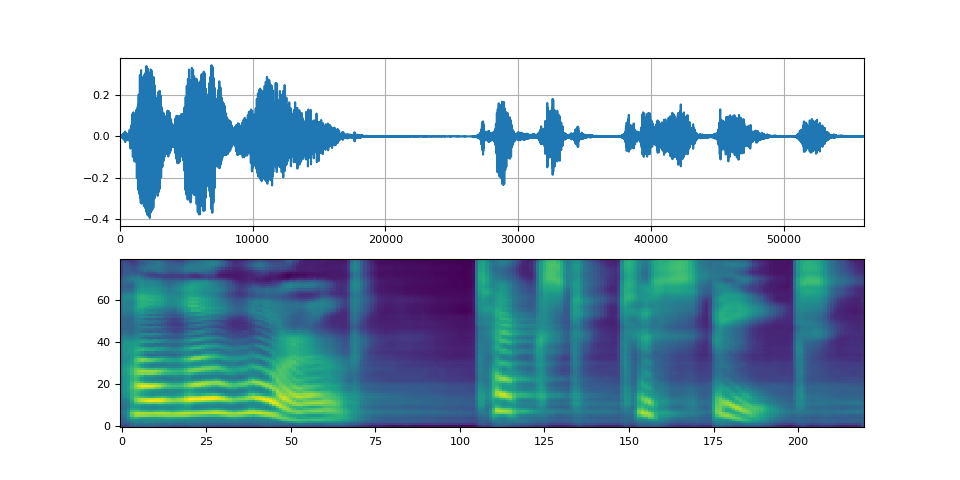
波形生成
生成频谱图后,最后一步是使用声码器从频谱图中恢复波形。
torchaudio 提供基于 GriffinLim 和
WaveRNN 的声码器。
WaveRNN 声码器
承接上一节,我们可以从同一个捆绑包中实例化匹配的 WaveRNN 模型。
bundle = torchaudio.pipelines.TACOTRON2_WAVERNN_PHONE_LJSPEECH

processor = bundle.get_text_processor()
tacotron2 = bundle.get_tacotron2().to(device)
vocoder = bundle.get_vocoder().to(device)

text = "Hello world! Text to speech!"

with torch.inference_mode():
    processed, lengths = processor(text)
    processed = processed.to(device)
    lengths = lengths.to(device)
    spec, spec_lengths, _ = tacotron2.infer(processed, lengths)
    waveforms, lengths = vocoder(spec, spec_lengths)
/pytorch/audio/ci_env/lib/python3.10/site-packages/dp/model/model.py:306: FutureWarning: You are using `torch.load` with `weights_only=False` (the current default value), which uses the default pickle module implicitly. It is possible to construct malicious pickle data which will execute arbitrary code during unpickling (See https://github.com/pytorch/pytorch/blob/main/SECURITY.md#untrusted-models for more details). In a future release, the default value for `weights_only` will be flipped to `True`. This limits the functions that could be executed during unpickling. Arbitrary objects will no longer be allowed to be loaded via this mode unless they are explicitly allowlisted by the user via `torch.serialization.add_safe_globals`. We recommend you start setting `weights_only=True` for any use case where you don't have full control of the loaded file. Please open an issue on GitHub for any issues related to this experimental feature.
  checkpoint = torch.load(checkpoint_path, map_location=device)
/pytorch/audio/ci_env/lib/python3.10/site-packages/torch/nn/modules/transformer.py:307: UserWarning: enable_nested_tensor is True, but self.use_nested_tensor is False because encoder_layer.self_attn.batch_first was not True(use batch_first for better inference performance)
  warnings.warn(f"enable_nested_tensor is True, but self.use_nested_tensor is False because {why_not_sparsity_fast_path}")
Downloading: "https://download.pytorch.org/torchaudio/models/wavernn_10k_epochs_8bits_ljspeech.pth" to /root/.cache/torch/hub/checkpoints/wavernn_10k_epochs_8bits_ljspeech.pth

  0%|          | 0.00/16.7M [00:00<?, ?B/s]
 96%|#########6| 16.0M/16.7M [00:00<00:00, 137MB/s]
100%|##########| 16.7M/16.7M [00:00<00:00, 138MB/s]
def plot(waveforms, spec, sample_rate):
    waveforms = waveforms.cpu().detach()

    fig, [ax1, ax2] = plt.subplots(2, 1)
    ax1.plot(waveforms[0])
    ax1.set_xlim(0, waveforms.size(-1))
    ax1.grid(True)
    ax2.imshow(spec[0].cpu().detach(), origin="lower", aspect="auto")
    return IPython.display.Audio(waveforms[0:1], rate=sample_rate)


plot(waveforms, spec, vocoder.sample_rate)
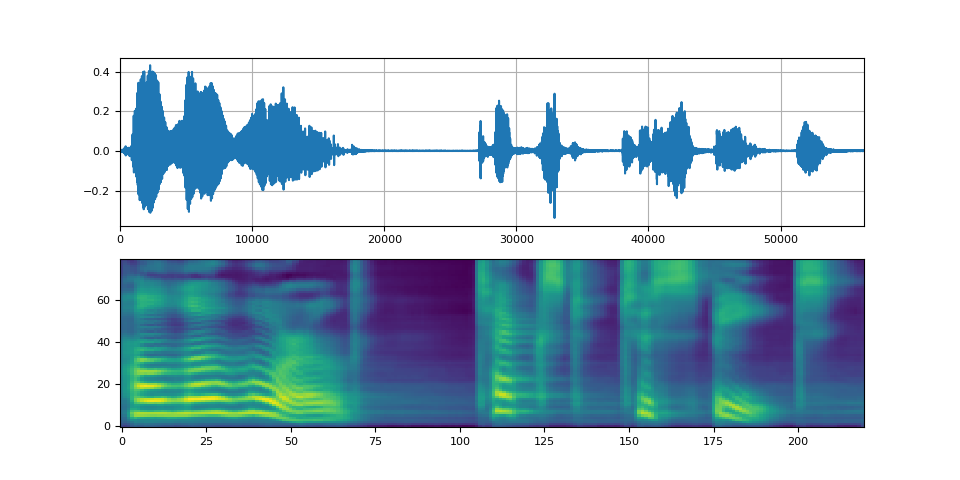
Griffin-Lim 声码器
使用 Griffin-Lim 声码器与 WaveRNN 相同。您可以实例化
声码器对象,使用
get_vocoder()
方法并传入频谱图。
bundle = torchaudio.pipelines.TACOTRON2_GRIFFINLIM_PHONE_LJSPEECH

processor = bundle.get_text_processor()
tacotron2 = bundle.get_tacotron2().to(device)
vocoder = bundle.get_vocoder().to(device)

with torch.inference_mode():
    processed, lengths = processor(text)
    processed = processed.to(device)
    lengths = lengths.to(device)
    spec, spec_lengths, _ = tacotron2.infer(processed, lengths)
waveforms, lengths = vocoder(spec, spec_lengths)
/pytorch/audio/ci_env/lib/python3.10/site-packages/dp/model/model.py:306: FutureWarning: You are using `torch.load` with `weights_only=False` (the current default value), which uses the default pickle module implicitly. It is possible to construct malicious pickle data which will execute arbitrary code during unpickling (See https://github.com/pytorch/pytorch/blob/main/SECURITY.md#untrusted-models for more details). In a future release, the default value for `weights_only` will be flipped to `True`. This limits the functions that could be executed during unpickling. Arbitrary objects will no longer be allowed to be loaded via this mode unless they are explicitly allowlisted by the user via `torch.serialization.add_safe_globals`. We recommend you start setting `weights_only=True` for any use case where you don't have full control of the loaded file. Please open an issue on GitHub for any issues related to this experimental feature.
  checkpoint = torch.load(checkpoint_path, map_location=device)
/pytorch/audio/ci_env/lib/python3.10/site-packages/torch/nn/modules/transformer.py:307: UserWarning: enable_nested_tensor is True, but self.use_nested_tensor is False because encoder_layer.self_attn.batch_first was not True(use batch_first for better inference performance)
  warnings.warn(f"enable_nested_tensor is True, but self.use_nested_tensor is False because {why_not_sparsity_fast_path}")
Downloading: "https://download.pytorch.org/torchaudio/models/tacotron2_english_phonemes_1500_epochs_ljspeech.pth" to /root/.cache/torch/hub/checkpoints/tacotron2_english_phonemes_1500_epochs_ljspeech.pth

  0%|          | 0.00/107M [00:00<?, ?B/s]
 14%|#3        | 14.9M/107M [00:00<00:01, 77.7MB/s]
 21%|##        | 22.4M/107M [00:00<00:01, 72.6MB/s]
 30%|##9       | 32.0M/107M [00:00<00:01, 46.9MB/s]
 35%|###4      | 37.1M/107M [00:00<00:01, 47.9MB/s]
 45%|####4     | 48.0M/107M [00:00<00:01, 52.2MB/s]
 50%|####9     | 53.2M/107M [00:01<00:01, 36.9MB/s]
 57%|#####6    | 60.8M/107M [00:01<00:01, 43.0MB/s]
 61%|######1   | 65.6M/107M [00:01<00:01, 42.6MB/s]
 74%|#######4  | 80.0M/107M [00:01<00:00, 59.6MB/s]
 88%|########8 | 94.9M/107M [00:01<00:00, 76.2MB/s]
 96%|#########5| 103M/107M [00:01<00:00, 72.9MB/s]
100%|##########| 107M/107M [00:01<00:00, 58.3MB/s]
Waveglow 声码器
Waveglow 是由 Nvidia 发布的声码器。预训练权重已发布在 Torch Hub 上。可以使用 torch.hub 模块实例化该模型。
# Workaround to load model mapped on GPU
# https://stackoverflow.com/a/61840832
waveglow = torch.hub.load(
    "NVIDIA/DeepLearningExamples:torchhub",
    "nvidia_waveglow",
    model_math="fp32",
    pretrained=False,
)
checkpoint = torch.hub.load_state_dict_from_url(
    "https://api.ngc.nvidia.com/v2/models/nvidia/waveglowpyt_fp32/versions/1/files/nvidia_waveglowpyt_fp32_20190306.pth",  # noqa: E501
    progress=False,
    map_location=device,
)
state_dict = {key.replace("module.", ""): value for key, value in checkpoint["state_dict"].items()}

waveglow.load_state_dict(state_dict)
waveglow = waveglow.remove_weightnorm(waveglow)
waveglow = waveglow.to(device)
waveglow.eval()

with torch.no_grad():
    waveforms = waveglow.infer(spec)
/pytorch/audio/ci_env/lib/python3.10/site-packages/torch/hub.py:295: UserWarning: You are about to download and run code from an untrusted repository. In a future release, this won't be allowed. To add the repository to your trusted list, change the command to {calling_fn}(..., trust_repo=False) and a command prompt will appear asking for an explicit confirmation of trust, or load(..., trust_repo=True), which will assume that the prompt is to be answered with 'yes'. You can also use load(..., trust_repo='check') which will only prompt for confirmation if the repo is not already trusted. This will eventually be the default behaviour
  warnings.warn(
Downloading: "https://github.com/NVIDIA/DeepLearningExamples/zipball/torchhub" to /root/.cache/torch/hub/torchhub.zip
/root/.cache/torch/hub/NVIDIA_DeepLearningExamples_torchhub/PyTorch/Classification/ConvNets/image_classification/models/common.py:13: UserWarning: pytorch_quantization module not found, quantization will not be available
  warnings.warn(
/root/.cache/torch/hub/NVIDIA_DeepLearningExamples_torchhub/PyTorch/Classification/ConvNets/image_classification/models/efficientnet.py:17: UserWarning: pytorch_quantization module not found, quantization will not be available
  warnings.warn(
/pytorch/audio/ci_env/lib/python3.10/site-packages/torch/nn/utils/weight_norm.py:134: FutureWarning: `torch.nn.utils.weight_norm` is deprecated in favor of `torch.nn.utils.parametrizations.weight_norm`.
  WeightNorm.apply(module, name, dim)
Downloading: "https://api.ngc.nvidia.com/v2/models/nvidia/waveglowpyt_fp32/versions/1/files/nvidia_waveglowpyt_fp32_20190306.pth" to /root/.cache/torch/hub/checkpoints/nvidia_waveglowpyt_fp32_20190306.pth
脚本的总运行时间: ( 1 分钟 17.796 秒)