注意
点击 这里 下载完整示例代码
使用 Emformer RNN-T 的设备端自动语音识别 (ASR)
作者: Pingchuan Ma, Moto Hira.
本教程演示了如何在流式设备输入(即笔记本电脑上的麦克风)上,使用 TorchAudio 运行端侧视听语音识别(AV-ASR 或 AVSR)。视听语音识别是指从音频和视频流中转写文本的任务,由于其对噪声的鲁棒性,近年来受到了广泛的研究关注。
注意
本教程需要 ffmpeg、sentencepiece、mediapipe、opencv-python 和 scikit-image 库。
有多种方法可以安装 ffmpeg 库。
如果您使用的是 Anaconda Python
发行版,conda install -c conda-forge 'ffmpeg<7' 将
安装兼容的 FFmpeg 库。
您可以运行
pip install sentencepiece mediapipe opencv-python scikit-image 来
安装其他提到的库。
注意
要运行本教程,请确保您位于 tutorial 文件夹中。
注意
我们在 MacBook Pro (M1 Pro) 上测试了 torchaudio 2.0.2 版本的教程。
import numpy as np
import sentencepiece as spm
import torch
import torchaudio
import torchvision
概述
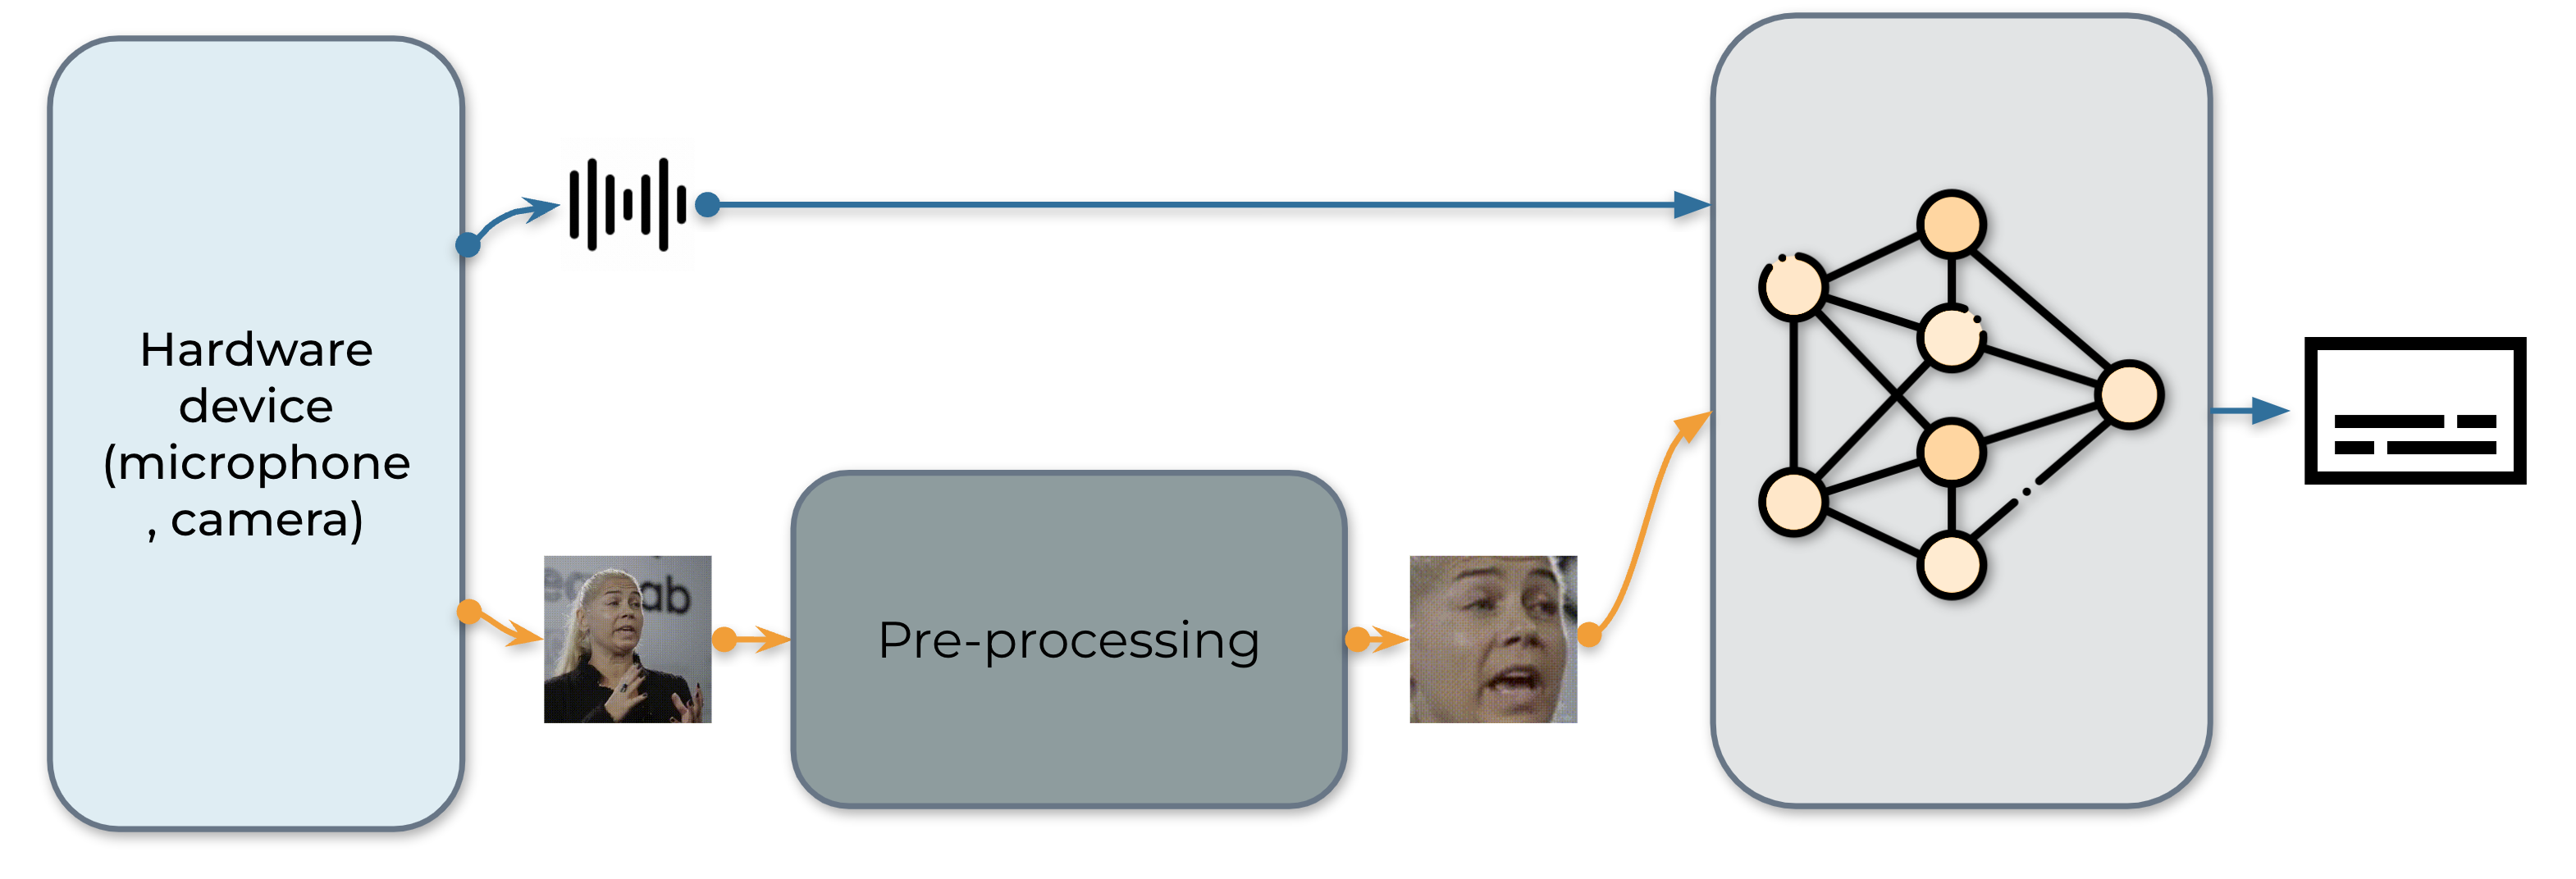
实时音视频自动语音识别系统如下所示,由三个组件构成:数据采集模块、预处理模块和端到端模型。数据采集模块为硬件设备,例如麦克风和摄像头,其作用是从现实世界收集信息。一旦信息被采集,预处理模块将定位并裁剪出人脸区域。接下来,我们将原始音频流和预处理后的视频流输入我们的端到端模型进行推理。
1. 数据获取
首先,我们定义一个函数来从麦克风和摄像头收集视频。具体来说,我们使用 StreamReader 类来实现数据收集的目的,该类支持从麦克风和摄像头捕获音频/视频。有关此类的详细用法,请参阅
教程。
def stream(q, format, option, src, segment_length, sample_rate):
    print("Building StreamReader...")
    streamer = torchaudio.io.StreamReader(src=src, format=format, option=option)
    streamer.add_basic_video_stream(frames_per_chunk=segment_length, buffer_chunk_size=500, width=600, height=340)
    streamer.add_basic_audio_stream(frames_per_chunk=segment_length * 640, sample_rate=sample_rate)

    print(streamer.get_src_stream_info(0))
    print(streamer.get_src_stream_info(1))
    print("Streaming...")
    print()
    for (chunk_v, chunk_a) in streamer.stream(timeout=-1, backoff=1.0):
        q.put([chunk_v, chunk_a])


class ContextCacher:
    def __init__(self, segment_length: int, context_length: int, rate_ratio: int):
        self.segment_length = segment_length
        self.context_length = context_length

        self.context_length_v = context_length
        self.context_length_a = context_length * rate_ratio
        self.context_v = torch.zeros([self.context_length_v, 3, 340, 600])
        self.context_a = torch.zeros([self.context_length_a, 1])

    def __call__(self, chunk_v, chunk_a):
        if chunk_v.size(0) < self.segment_length:
            chunk_v = torch.nn.functional.pad(chunk_v, (0, 0, 0, 0, 0, 0, 0, self.segment_length - chunk_v.size(0)))
        if chunk_a.size(0) < self.segment_length * 640:
            chunk_a = torch.nn.functional.pad(chunk_a, (0, 0, 0, self.segment_length * 640 - chunk_a.size(0)))

        if self.context_length == 0:
            return chunk_v.float(), chunk_a.float()
        else:
            chunk_with_context_v = torch.cat((self.context_v, chunk_v))
            chunk_with_context_a = torch.cat((self.context_a, chunk_a))
            self.context_v = chunk_v[-self.context_length_v :]
            self.context_a = chunk_a[-self.context_length_a :]
            return chunk_with_context_v.float(), chunk_with_context_a.float()
2. 数据预处理
在将原始视频流输入模型之前,每个视频序列都必须经过特定的预处理流程。该流程包含三个关键步骤。第一步是执行人脸检测。随后,将每一帧图像对齐到参考帧(通常称为平均脸),以消除帧间旋转和尺寸差异。预处理模块的最后一步是从对齐后的人脸图像中裁剪出人脸区域。
 |
 |
 |
 |
|
|
|
|
import sys

sys.path.insert(0, "../../examples")

from avsr.data_prep.detectors.mediapipe.detector import LandmarksDetector
from avsr.data_prep.detectors.mediapipe.video_process import VideoProcess


class FunctionalModule(torch.nn.Module):
    def __init__(self, functional):
        super().__init__()
        self.functional = functional

    def forward(self, input):
        return self.functional(input)


class Preprocessing(torch.nn.Module):
    def __init__(self):
        super().__init__()
        self.landmarks_detector = LandmarksDetector()
        self.video_process = VideoProcess()
        self.video_transform = torch.nn.Sequential(
            FunctionalModule(
                lambda n: [(lambda x: torchvision.transforms.functional.resize(x, 44, antialias=True))(i) for i in n]
            ),
            FunctionalModule(lambda x: torch.stack(x)),
            torchvision.transforms.Normalize(0.0, 255.0),
            torchvision.transforms.Grayscale(),
            torchvision.transforms.Normalize(0.421, 0.165),
        )

    def forward(self, audio, video):
        video = video.permute(0, 2, 3, 1).cpu().numpy().astype(np.uint8)
        landmarks = self.landmarks_detector(video)
        video = self.video_process(video, landmarks)
        video = torch.tensor(video).permute(0, 3, 1, 2).float()
        video = self.video_transform(video)
        audio = audio.mean(axis=-1, keepdim=True)
        return audio, video
3. 构建推理管道
下一步是创建流水线所需的组件。
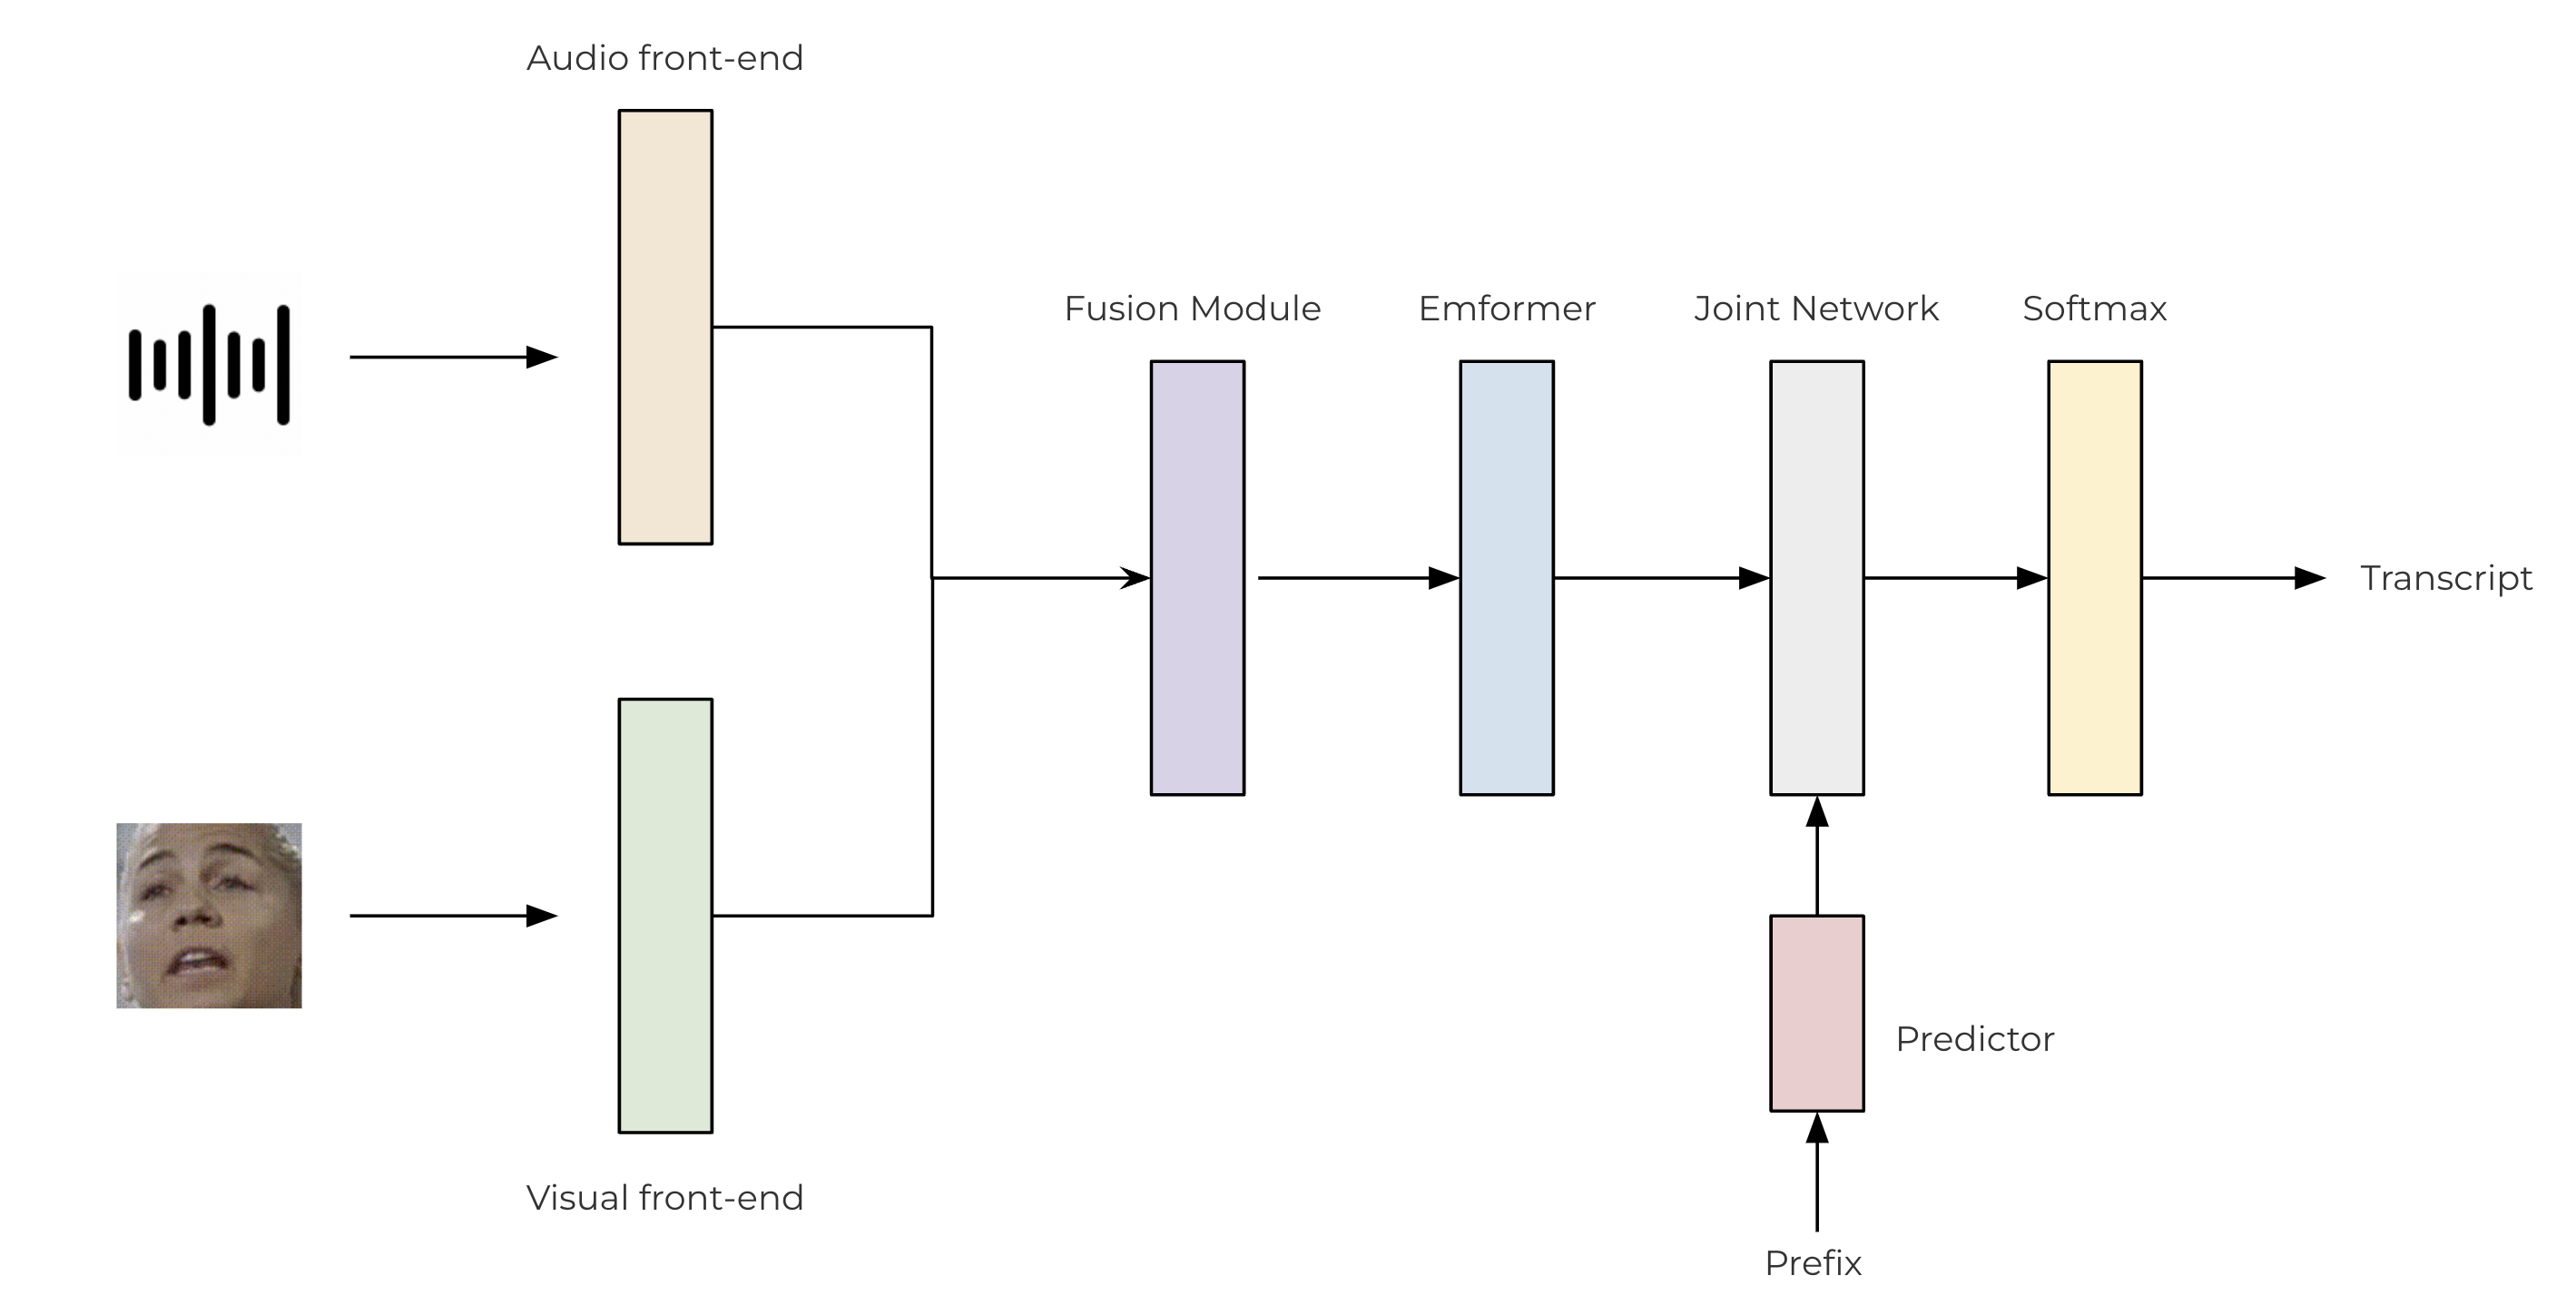
我们使用基于卷积的前端从原始音频和视频流中提取特征。这些特征随后通过一个两层的多层感知机(MLP)进行融合。对于我们的转换器模型,我们利用了 TorchAudio 库,该库集成了编码器(Emformer)、预测器和联合网络。所提出的 AV-ASR 模型的架构如下图所示。
class SentencePieceTokenProcessor:
    def __init__(self, sp_model):
        self.sp_model = sp_model
        self.post_process_remove_list = {
            self.sp_model.unk_id(),
            self.sp_model.eos_id(),
            self.sp_model.pad_id(),
        }

    def __call__(self, tokens, lstrip: bool = True) -> str:
        filtered_hypo_tokens = [
            token_index for token_index in tokens[1:] if token_index not in self.post_process_remove_list
        ]
        output_string = "".join(self.sp_model.id_to_piece(filtered_hypo_tokens)).replace("\u2581", " ")

        if lstrip:
            return output_string.lstrip()
        else:
            return output_string


class InferencePipeline(torch.nn.Module):
    def __init__(self, preprocessor, model, decoder, token_processor):
        super().__init__()
        self.preprocessor = preprocessor
        self.model = model
        self.decoder = decoder
        self.token_processor = token_processor

        self.state = None
        self.hypotheses = None

    def forward(self, audio, video):
        audio, video = self.preprocessor(audio, video)
        feats = self.model(audio.unsqueeze(0), video.unsqueeze(0))
        length = torch.tensor([feats.size(1)], device=audio.device)
        self.hypotheses, self.state = self.decoder.infer(feats, length, 10, state=self.state, hypothesis=self.hypotheses)
        transcript = self.token_processor(self.hypotheses[0][0], lstrip=False)
        return transcript


def _get_inference_pipeline(model_path, spm_model_path):
    model = torch.jit.load(model_path)
    model.eval()

    sp_model = spm.SentencePieceProcessor(model_file=spm_model_path)
    token_processor = SentencePieceTokenProcessor(sp_model)

    decoder = torchaudio.models.RNNTBeamSearch(model.model, sp_model.get_piece_size())

    return InferencePipeline(
        preprocessor=Preprocessing(),
        model=model,
        decoder=decoder,
        token_processor=token_processor,
    )
4. 主进程
主进程的执行流程如下:
初始化推理流水线。
启动数据采集子进程。
运行推理。
清理
from torchaudio.utils import download_asset


def main(device, src, option=None):
    print("Building pipeline...")
    model_path = download_asset("tutorial-assets/device_avsr_model.pt")
    spm_model_path = download_asset("tutorial-assets/spm_unigram_1023.model")

    pipeline = _get_inference_pipeline(model_path, spm_model_path)

    BUFFER_SIZE = 32
    segment_length = 8
    context_length = 4
    sample_rate = 19200
    frame_rate = 30
    rate_ratio = sample_rate // frame_rate
    cacher = ContextCacher(BUFFER_SIZE, context_length, rate_ratio)

    import torch.multiprocessing as mp

    ctx = mp.get_context("spawn")

    @torch.inference_mode()
    def infer():
        num_video_frames = 0
        video_chunks = []
        audio_chunks = []
        while True:
            chunk_v, chunk_a = q.get()
            num_video_frames += chunk_a.size(0) // 640
            video_chunks.append(chunk_v)
            audio_chunks.append(chunk_a)
            if num_video_frames < BUFFER_SIZE:
                continue
            video = torch.cat(video_chunks)
            audio = torch.cat(audio_chunks)
            video, audio = cacher(video, audio)
            pipeline.state, pipeline.hypotheses = None, None
            transcript = pipeline(audio, video.float())
            print(transcript, end="", flush=True)
            num_video_frames = 0
            video_chunks = []
            audio_chunks = []

    q = ctx.Queue()
    p = ctx.Process(target=stream, args=(q, device, option, src, segment_length, sample_rate))
    p.start()
    infer()
    p.join()


if __name__ == "__main__":
    main(
        device="avfoundation",
        src="0:1",
        option={"framerate": "30", "pixel_format": "rgb24"},
    )
Building pipeline...
Building StreamReader...
SourceVideoStream(media_type='video', codec='rawvideo', codec_long_name='raw video', format='uyvy422', bit_rate=0, num_frames=0, bits_per_sample=0, metadata={}, width=1552, height=1552, frame_rate=1000000.0)
SourceAudioStream(media_type='audio', codec='pcm_f32le', codec_long_name='PCM 32-bit floating point little-endian', format='flt', bit_rate=1536000, num_frames=0, bits_per_sample=0, metadata={}, sample_rate=48000.0, num_channels=1)
Streaming...

hello world
Tag: torchaudio.io
脚本的总运行时间: ( 0 分钟 0.000 秒)