使用Torchserve提供大型模型服务
这个文档解释了Torchserve如何支持大型模型服务,这里的大型模型指的是那些无法在一个GPU上运行的模型,因此需要在多个GPU上分割成多个分区。 这个页面分为以下几部分:
如何工作?
对于较小模型的GPU推理,TorchServe为每个工作进程执行一个进程,并为其分配一个GPU。
对于大型模型推理,模型需要分布在多个GPU上。
有几种不同的模式可以实现这种分布,通常包括流水线并行(PP)、张量并行或这些方法的组合。
选择哪种模式以及如何实现分布取决于所使用框架的实现。
TorchServe允许用户使用任何框架进行模型部署,并通过灵活的配置来满足框架的需求。
一些框架要求为每个GPU执行单独的进程(如PiPPy、Deep Speed),而其他框架则要求一个进程被分配所有GPU(如vLLM)。
如果需要多个进程,TorchServe将使用torchrun为工作进程设置分布式环境。
在设置过程中,torchrun将为分配给工作进程的每个GPU启动一个新进程。
是否使用torchrun取决于可以在model-config.yaml中设置为以下选项之一的parallelType参数:
pp- 用于管道并行tp- 为张量并行pptp- for pipeline + tensor parallelcustom
前三个选项使用torchrun设置环境,而“自定义”选项则留给用户自行决定并行化的方式,并将GPU分配给一个工作者到一个进程。 分配的GPU数量由torchrun启动的过程数确定,即通过nproc-per-node配置,或者由parallelLevel参数决定。 这意味着如果设置了nproc-per-node,就不能再设置parallelLevel,反之亦然。
默认情况下,TorchServe 使用轮询算法将 GPU 分配给主机上的一个工人。 对于大型模型的推理,每个工人的 GPU 是自动计算的,基于 model_config.yaml 中指定的 GPU 数量。 CUDA_VISIBLE_DEVICES 根据这个数量设置。
例如,假设一个节点上有八个GPU,并且一个工人需要在该节点上分配四个GPU(即nproc-per-node=4或parallelLevel=4)。 在这种情况下,TorchServe会将CUDA_VISIBLE_DEVICES=”0,1,2,3”分配给worker1,将CUDA_VISIBLE_DEVICES=”4,5,6,7”分配给worker2。
除了这种默认行为外,TorchServe 为用户提供了指定 GPU 给工作者的灵活性。例如,如果用户在 模型配置 YAML 文件中设置 “deviceIds: [2,3,4,5]”,并且 nproc-per-node(或 parallelLevel)设置为 2,那么 TorchServe 将为 worker1 分配 CUDA_VISIBLE_DEVICES=”2,3”,为 worker2 分配 CUDA_VISIBLE_DEVICES=”4,5”。
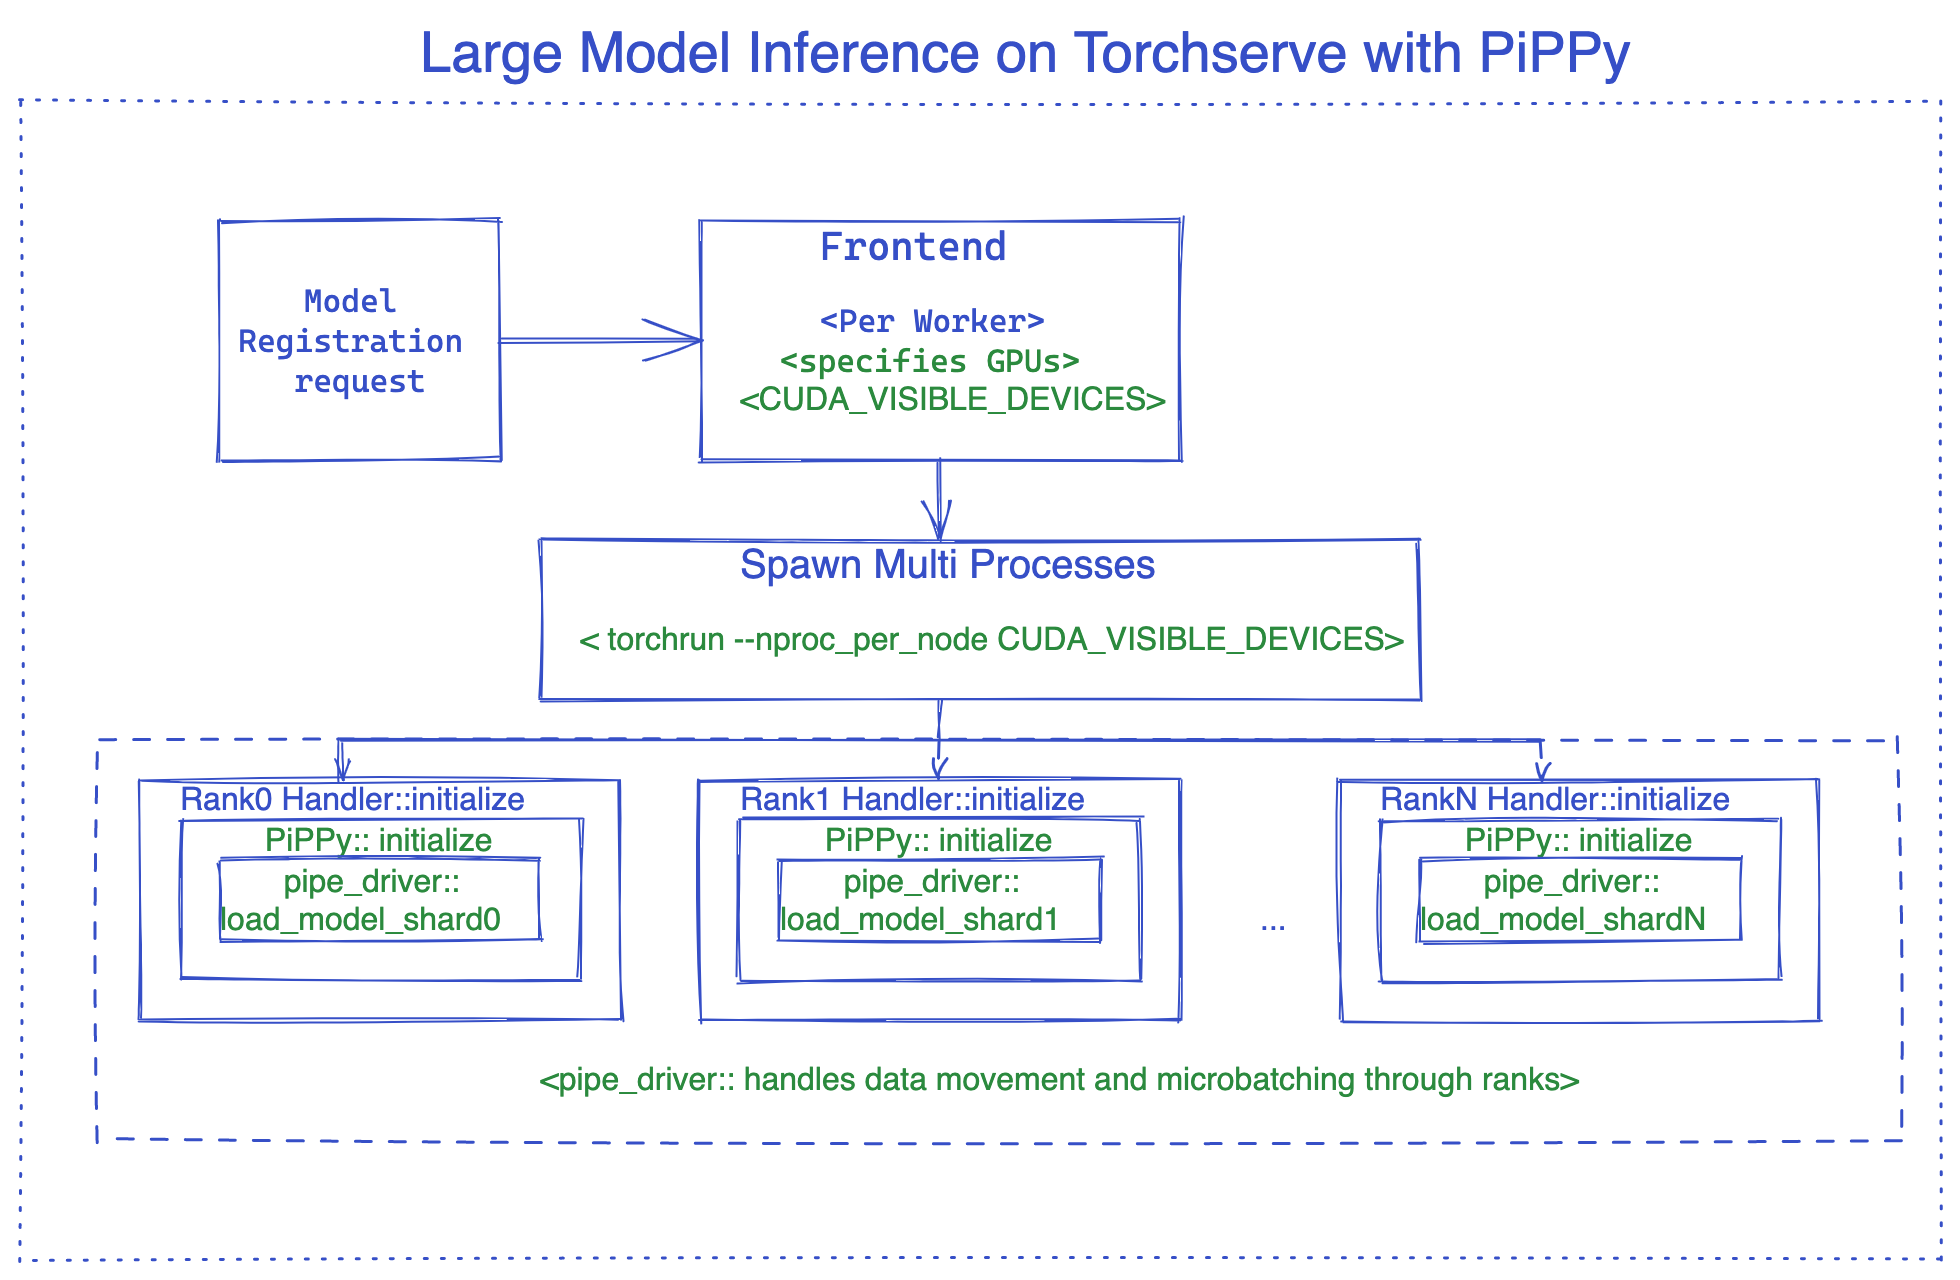
使用Pippy集成作为示例,下图说明了TorchServe大模型推理的内部结构。 有关使用vLLM的示例,请参见此示例。
PyPPy (PyTorch Native解决方案用于大型模型推理)
PiPPy 提供了管道并行处理,可以为服务大型模型提供支持,这些模型无法在一个 GPU 上运行。它将你的模型拆分成相等大小的部分(阶段),这些部分在你指定的设备数量上进行分区。然后使用微批次处理来运行你的批量输入进行推理(对于批处理大小大于 1 的情况,这是更优的选择)。
如何在Torchserve中使用PiPPy
要在Torchserve中使用Pippy,我们需要使用一个自定义处理器,该处理器继承自base_pippy_handler,并将我们的设置放在model-config.yaml文件中。
Torchserve中的客户处理者只是一个简单的Python脚本,它定义了特定于您工作流程的模型加载、预处理、推理和后处理逻辑。
看起来像下面这样:
创建 custom_handler.py 或任何其他描述性名称。
#DO import the necessary packages along with following
from ts.torch_handler.distributed.base_pippy_handler import BasePippyHandler
from ts.handler_utils.distributed.pt_pippy import initialize_rpc_workers, get_pipline_driver
class ModelHandler(BasePippyHandler, ABC):
    def __init__(self):
        super(ModelHandler, self).__init__()
        self.initialized = False

    def initialize(self, ctx):
        model = # load your model from model_dir
        self.device = self.local_rank %  torch.cuda.device_count()# being used to move model inputs to (self.device)
        self.model = get_pipline_driver(model,self.world_size, ctx)
这是你的 model-config.yaml 需要的,这个配置文件非常灵活,你可以添加与前端、后端和处理器相关的设置。
#frontend settings
minWorkers: 1
maxWorkers: 1
maxBatchDelay: 100
responseTimeout: 120
deviceType: "gpu"
parallelType: "pp" # options depending on the solution, pp(pipeline parallelism), tp(tensor parallelism), pptp ( pipeline and tensor parallelism)
                   # This will be used to route input to either rank0 or all ranks from fontend based on the solution (e.g. DeepSpeed support tp, PiPPy support pp)
torchrun:
    nproc-per-node: 4 # specifies the number of processes torchrun starts to serve your model, set to world_size or number of
                      # gpus you wish to split your model
#backend settings
pippy:
    chunks: 1 # This sets the microbatch sizes, microbatch = batch size/ chunks
    input_names: ['input_ids'] # input arg names to the model, this is required for FX tracing
    model_type: "HF" # set the model type to HF if you are using Huggingface model other wise leave it blank or any other model you use.
    rpc_timeout: 1800
    num_worker_threads: 512 #set number of threads for rpc worker init.

handler:
    max_length: 80 # max length of tokens for tokenizer in the handler
如何在处理程序中访问它? 这里有一个示例:
def initialize(self, ctx):
    model_type = ctx.model_yaml_config["pippy"]["model_type"]
在Torchserve中,剩下的步骤和往常一样,主要是打包你的模型并启动服务器。
打包模型的示例命令,请确保传递 model-config.yaml
torch-model-archiver --model-name bloom --version 1.0 --handler pippy_handler.py --extra-files $MODEL_CHECKPOINTS_PATH -r requirements.txt --config-file model-config.yaml --archive-format tgz
正在开发张量并行支持,并将在准备好后尽快添加。
DeepSpeed
DeepSpeed-Inference 是一个开源项目,由 Microsoft 开发。它为运行在多个 GPU 上的大规模 Transformer 基础的 PyTorch 模型提供了模型并行性。
如何在TorchServe中使用DeepSpeed
要在TorchServe中使用DeepSpeed,我们需要使用一个自定义处理器,该处理器继承自base_deepspeed_handler,并将我们的设置放在model-config.yaml文件中。
看起来像下面这样:
创建 custom_handler.py 或任何其他描述性名称。
#DO import the necessary packages along with following
from ts.handler_utils.distributed.deepspeed import get_ds_engine
from ts.torch_handler.distributed.base_deepspeed_handler import BaseDeepSpeedHandler
class ModelHandler(BaseDeepSpeedHandler, ABC):
    def __init__(self):
        super(ModelHandler, self).__init__()
        self.initialized = False

    def initialize(self, ctx):
        model = # load your model from model_dir
        ds_engine = get_ds_engine(self.model, ctx)
        self.model = ds_engine.module
        self.initialized = True
这是你的 model-config.yaml 需要的,这个配置文件非常灵活,你可以添加与前端、后端和处理器相关的设置。
#frontend settings
minWorkers: 1
maxWorkers: 1
maxBatchDelay: 100
responseTimeout: 120
deviceType: "gpu"
parallelType: "tp" # options depending on the solution, pp(pipeline parallelism), tp(tensor parallelism), pptp ( pipeline and tensor parallelism)
                   # This will be used to route input to either rank0 or all ranks from fontend based on the solution (e.g. DeepSpeed support tp, PiPPy support pp)
torchrun:
    nproc-per-node: 4 # specifies the number of processes torchrun starts to serve your model, set to world_size or number of
                      # gpus you wish to split your model
#backend settings
deepspeed:
    config: ds-config.json # DeepSpeed config json filename.
                           # Details:https://www.deepspeed.ai/docs/config-json/
handler:
    max_length: 80 # max length of tokens for tokenizer in the handler
这是ds-config.json的一个例子
{
  "dtype": "torch.float16",
  "replace_with_kernel_inject": true,
  "tensor_parallel": {
    "tp_size": 2
  }
}
安装 DeepSpeed
方法1: requirements.txt
方法2: 通过命令行预安装(推荐以加快模型加载)
# See https://www.deepspeed.ai/tutorials/advanced-install/
DS_BUILD_OPS=1 pip install deepspeed
在Torchserve中,剩下的步骤和往常一样,主要是打包你的模型并启动服务器。
打包模型的示例命令,请确保传递 model-config.yaml
# option 1: Using model_dir
torch-model-archiver --model-name bloom --version 1.0 --handler deepspeed_handler.py --extra-files $MODEL_CHECKPOINTS_PATH,ds-config.json -r requirements.txt --config-file model-config.yaml --archive-format tgz

# option 2: Using HF model_name
torch-model-archiver --model-name bloom --version 1.0 --handler deepspeed_handler.py --extra-files ds-config.json -r requirements.txt --config-file model-config.yaml --archive-format
DeepSpeed MII
如果使用此处显示的支持的模型之一,您可以利用Deep Speed MII。Deep Speed MII 使用 Deep Speed 推理以及深度学习的进一步发展来最小化延迟并最大化吞吐量。它针对特定的模型类型、模型大小、批量大小和可用硬件资源实现这一目标。
有关如何在支持的模型上利用Deep Speed MII的更多信息,请参阅此处的信息。 您还可以找到如何将其应用于TorchServe的示例此处。
使用Accelerate提供大型Hugging Face模型服务
如果在处理大型Hugging Face模型时资源有限,可以使用accelerate来提供这些模型。要实现这一点,您需要设置low_cpu_mem_usage=True并在setup_config.json文件中将`device_map=”auto”。
有关将 accelerate 与大型 Hugging Face 模型结合使用的更多信息,请参阅 此示例。
大型模型推理技巧
减少模型加载延迟
为了降低模型延迟,我们建议:
在容器或主机上预安装模型并行库,例如Deepspeed。
预下载模型检查点。例如,如果使用HuggingFace,则可以通过Download_model.py预先下载一个预训练模型
设置环境变量 HUGGINGFACE_HUB_CACHE 和 TRANSFORMERS_CACHE
通过工具 Download_model.py 将模型下载到 HuggingFace 缓存目录
调整 模型配置YAML文件
你可以通过以下方式调整模型配置YAML文件以获得更好的性能:
如果高模型推理延迟导致响应超时,请更新responseTimeout。
如果高模型加载延迟导致启动超时,请更新startupTimeout。
调整 torchrun 参数。支持的参数在 这里 定义。例如,默认情况下,
OMP_NUMBER_THREADS是 1。这可以在 YAML 文件中进行修改。
#frontend settings
torchrun:
    nproc-per-node: 4 # specifies the number of processes torchrun starts to serve your model, set to world_size or number of
                      # gpus you wish to split your model
    OMP_NUMBER_THREADS: 2
敏感延迟的应用程序
工作票
任务票功能推荐用于对敏感延迟推理的使用案例。当启用任务票时,TorchServe会验证模型活跃工作者是否可用以处理客户端请求。如果存在活跃工作者,则接受并立即处理请求,无需从任务队列或动态批量中产生的等待时间;否则,向客户端发送503响应。
这个功能有助于处理推断延迟较高的用例,例如生成模型和像ChatGPT这样的自回归解码器模型。这个功能可以帮助这类应用采取有效的行动,例如将被拒绝的请求路由到不同的服务器,或者根据业务需求调整模型服务器的容量。这里是一个启用任务票示例。
minWorkers: 2
maxWorkers: 2
jobQueueSize: 2
useJobTicket: true
在这个例子中,一个模型有2个工人,任务队列大小为2。推理请求要么立即由TorchServe处理,要么以响应代码503被拒绝。
流式响应通过HTTP 1.1分块编码
TorchServe的推理API支持流式响应,允许将一系列推理响应通过HTTP 1.1分块编码发送。此功能仅推荐用于全响应延迟高的情况下,并将推理中间结果发送到客户端。例如,对于需要生成大量令牌的应用程序(如LLMs),生成“n”个令牌可能具有高延迟。在这种情况下,用户可以接收每个生成的令牌直到完整响应完成。要实现流式响应,后端处理器调用“send_intermediate_predict_response”以将一个中间结果发送到前端,并返回最后一个结果作为现有风格。例如,
from ts.handler_utils.utils import send_intermediate_predict_response
''' Note: TorchServe v1.0.0 will deprecate
"from ts.protocol.otf_message_handler import send_intermediate_predict_response".
Please replace it with "from ts.handler_utils.utils import send_intermediate_predict_response".
'''
def handle(data, context):
    if type(data) is list:
        for i in range (3):
            send_intermediate_predict_response(["intermediate_response"], context.request_ids, "Intermediate Prediction success", 200, context)
        return ["hello world "]
客户端接收分块的数据。
import test_utils

def test_echo_stream_inference():
    test_utils.start_torchserve(no_config_snapshots=True, gen_mar=False)
    test_utils.register_model('echo_stream',
                              'https://torchserve.pytorch.org/mar_files/echo_stream.mar')

    response = requests.post(TF_INFERENCE_API + '/predictions/echo_stream', data="foo", stream=True)
    assert response.headers['Transfer-Encoding'] == 'chunked'

    prediction = []
    for chunk in (response.iter_content(chunk_size=None)):
        if chunk:
            prediction.append(chunk.decode("utf-8"))

    assert str(" ".join(prediction)) == "hello hello hello hello world "
    test_utils.unregister_model('echo_stream')
GRPC 服务器端流式传输
TorchServe GRPC API 添加了服务器端流式传输的推理API“StreamPredictions”,允许将一系列推理响应通过相同的GRPC流发送。此API仅推荐用于全响应延迟高的使用案例,并将推理中间结果发送到客户端。一个例子可能是LLMs用于生成应用程序,其中生成“n”个令牌可能具有高延迟。类似于HTTP 1.1分块编码,通过此功能用户可以接收每个生成的令牌直到完整响应完成。此API自动强制batchSize为一。
service InferenceAPIsService {
    // Check health status of the TorchServe server.
    rpc Ping(google.protobuf.Empty) returns (TorchServeHealthResponse) {}

    // Predictions entry point to get inference using default model version.
    rpc Predictions(PredictionsRequest) returns (PredictionResponse) {}

    // Streaming response for an inference request.
    rpc StreamPredictions(PredictionsRequest) returns (stream PredictionResponse) {}
}
后端处理器调用“send_intermediate_predict_response”发送一个中间结果到前端,并返回最后一个结果作为现有风格。例如
from ts.handler_utils.utils import send_intermediate_predict_response
''' Note: TorchServe v1.0.0 will deprecate
"from ts.protocol.otf_message_handler import send_intermediate_predict_response".
Please replace it with "from ts.handler_utils.utils import send_intermediate_predict_response".
'''


def handle(data, context):
    if type(data) is list:
        for i in range (3):
            send_intermediate_predict_response(["intermediate_response"], context.request_ids, "Intermediate Prediction success", 200, context)
        return ["hello world "]