注意
转到末尾 以下载完整示例代码。
使用回放缓冲区
作者: Vincent Moens
经验回放缓冲区(Replay buffers)是任何强化学习(RL)或控制算法的核心组成部分。 监督学习方法通常以训练循环为特征:数据从静态数据集中随机抽取,并依次输入模型和损失函数。 而在强化学习中,情况往往略有不同:数据通过模型采集,随后暂时存储在一种动态结构(即经验回放缓冲区)中,该结构作为损失模块的数据集。
与以往一样,缓冲区的使用场景会极大地影响其构建方式:一些用户可能希望存储轨迹,而另一些用户则希望存储单个转移。在特定场景下,某些采样策略可能更为合适:例如,部分条目可能具有更高的优先级,或者是否进行有放回或无放回采样可能至关重要。 计算因素也可能产生影响,例如缓冲区的大小可能超出可用的内存(RAM)容量。
出于这些原因,TorchRL 的经验回放缓冲区具有完全的可组合性:尽管它们“开箱即用”,构建所需的工作量极小,但也支持多种自定义功能,例如存储类型、采样策略或数据变换。
在这个教程中,你将学习:
如何构建重放缓冲区(RB)并将其与任意数据类型配合使用;
如何自定义缓冲区的存储;
如何使用 RBs with TensorDict;
如何从重放缓冲区中采样或遍历其中的数据, 以及如何定义采样策略;
如何使用 优先经验回放缓冲区;
如何转换进出缓冲区的数据;
如何在缓冲区中存储 轨迹。
基础:构建一个简单的重放缓冲区
TorchRL 的经验回放缓冲区旨在优先考虑模块化、可组合性、高效性和简洁性。例如,创建一个基础的经验回放缓冲区是一个简单直接的过程,如下例所示:
import tempfile

from torchrl.data import ReplayBuffer

buffer = ReplayBuffer()
默认情况下,此重放缓冲区的大小为1000。让我们通过使用 extend() 方法来填充我们的缓冲区进行检查:
print("length before adding elements:", len(buffer))

buffer.extend(range(2000))

print("length after adding elements:", len(buffer))
length before adding elements: 0
length after adding elements: 1000
我们使用了 extend() 方法,该方法设计用于一次性添加多个项目。如果传递给 extend 的对象具有多于一个维度,则其第一个维度被视为要在缓冲区中拆分为单独元素的维度。
这实际上意味着,当向缓冲区添加多维张量或张量字典(tensordicts)时,缓冲区在统计其内存中所保存的元素数量时,仅会查看第一个维度。 如果传入的对象不可迭代,则会抛出异常。
要逐个添加项目,请使用 add() 方法。
自定义存储
我们看到缓冲区已被限制为仅包含我们传入的前 1000 个元素。 要更改其大小,我们需要自定义存储。
TorchRL 提出了三种类型的存储:
The
ListStorage独立存储元素在列表中。它支持任何数据类型,但这种灵活性以效率为代价;The
LazyTensorStorage存储张量数据结构时是连续的。 它自然地与TensorDict(或tensorclass) 对象一起工作。存储在每个张量的基础上是连续的,这意味着 采样将比使用列表更高效,但隐含的限制是传递给它的任何数据都必须具有相同的 基本属性(例如形状和数据类型)作为用于实例化缓冲区的第一个批次的数据。 传递不符合此要求的数据将引发异常或导致某些未定义的行为。The
LazyMemmapStorage作为LazyTensorStorage起作用,因为它是懒惰的(即,它 期望第一个数据批次被实例化),并且它要求每个存储的数据批次在形状和dtype上匹配。这种存储的独特之处在于它指向磁盘文件(或使用文件系统存储),这意味着它可以支持非常大的数据集,同时仍然以连续的方式访问数据。
让我们看看如何使用这些存储:
from torchrl.data import LazyMemmapStorage, LazyTensorStorage, ListStorage

# We define the maximum size of the buffer
size = 100
一个带有列表存储缓冲区的缓冲区可以存储任何类型的数据(但我们必须更改collate_fn,因为默认情况下期望的是数值数据):
buffer_list = ReplayBuffer(storage=ListStorage(size), collate_fn=lambda x: x)
buffer_list.extend(["a", 0, "b"])
print(buffer_list.sample(3))
['a', 'a', 0]
因为它是最少假设的,ListStorage 是 TorchRL 中的默认存储。
一个 LazyTensorStorage 可以连续存储数据。
在处理复杂但不变的中等大小的数据结构时,这应该是首选选项:
buffer_lazytensor = ReplayBuffer(storage=LazyTensorStorage(size))
让我们创建一个大小为 ``torch.Size([3])` 的数据批次,其中包含 2 个张量
import torch
from tensordict import TensorDict

data = TensorDict(
    {
        "a": torch.arange(12).view(3, 4),
        ("b", "c"): torch.arange(15).view(3, 5),
    },
    batch_size=[3],
)
print(data)
TensorDict(
    fields={
        a: Tensor(shape=torch.Size([3, 4]), device=cpu, dtype=torch.int64, is_shared=False),
        b: TensorDict(
            fields={
                c: Tensor(shape=torch.Size([3, 5]), device=cpu, dtype=torch.int64, is_shared=False)},
            batch_size=torch.Size([3]),
            device=None,
            is_shared=False)},
    batch_size=torch.Size([3]),
    device=None,
    is_shared=False)
对 extend() 的第一次调用将实例化存储。数据的第一个维度被拆分为单独的数据点:
buffer_lazytensor.extend(data)
print(f"The buffer has {len(buffer_lazytensor)} elements")
The buffer has 3 elements
让我们从缓冲区采样,并打印数据:
sample = buffer_lazytensor.sample(5)
print("samples", sample["a"], sample["b", "c"])
samples tensor([[0, 1, 2, 3],
        [0, 1, 2, 3],
        [4, 5, 6, 7],
        [0, 1, 2, 3],
        [0, 1, 2, 3]]) tensor([[0, 1, 2, 3, 4],
        [0, 1, 2, 3, 4],
        [5, 6, 7, 8, 9],
        [0, 1, 2, 3, 4],
        [0, 1, 2, 3, 4]])
一个 LazyMemmapStorage 是以相同的方式创建的:
buffer_lazymemmap = ReplayBuffer(storage=LazyMemmapStorage(size))
buffer_lazymemmap.extend(data)
print(f"The buffer has {len(buffer_lazymemmap)} elements")
sample = buffer_lazytensor.sample(5)
print("samples: a=", sample["a"], "\n('b', 'c'):", sample["b", "c"])
The buffer has 3 elements
samples: a= tensor([[ 0,  1,  2,  3],
        [ 0,  1,  2,  3],
        [ 0,  1,  2,  3],
        [ 8,  9, 10, 11],
        [ 8,  9, 10, 11]])
('b', 'c'): tensor([[ 0,  1,  2,  3,  4],
        [ 0,  1,  2,  3,  4],
        [ 0,  1,  2,  3,  4],
        [10, 11, 12, 13, 14],
        [10, 11, 12, 13, 14]])
我们还可以自定义磁盘上的存储位置:
tempdir = tempfile.TemporaryDirectory()
buffer_lazymemmap = ReplayBuffer(storage=LazyMemmapStorage(size, scratch_dir=tempdir))
buffer_lazymemmap.extend(data)
print(f"The buffer has {len(buffer_lazymemmap)} elements")
print("the 'a' tensor is stored in", buffer_lazymemmap._storage._storage["a"].filename)
print(
    "the ('b', 'c') tensor is stored in",
    buffer_lazymemmap._storage._storage["b", "c"].filename,
)
The buffer has 3 elements
the 'a' tensor is stored in /pytorch/rl/docs/source/reference/generated/tutorials/<TemporaryDirectory '/tmp/tmpzxmvjdim'>/a.memmap
the ('b', 'c') tensor is stored in /pytorch/rl/docs/source/reference/generated/tutorials/<TemporaryDirectory '/tmp/tmpzxmvjdim'>/b/c.memmap
与TensorDict集成
张量的位置遵循与其所在 TensorDict 相同的结构:这使得在训练过程中保存和加载缓冲区变得十分便捷。
要充分利用TensorDict作为数据载体的全部潜力,可以使用TensorDictReplayBuffer类。
其主要优点之一是能够处理采样数据的组织,以及可能需要的任何其他信息(例如样本索引)。
它可以像标准的
ReplayBuffer一样构建,并且通常可以互换使用。
from torchrl.data import TensorDictReplayBuffer

tempdir = tempfile.TemporaryDirectory()
buffer_lazymemmap = TensorDictReplayBuffer(
    storage=LazyMemmapStorage(size, scratch_dir=tempdir), batch_size=12
)
buffer_lazymemmap.extend(data)
print(f"The buffer has {len(buffer_lazymemmap)} elements")
sample = buffer_lazymemmap.sample()
print("sample:", sample)
The buffer has 3 elements
sample: TensorDict(
    fields={
        a: Tensor(shape=torch.Size([12, 4]), device=cpu, dtype=torch.int64, is_shared=False),
        b: TensorDict(
            fields={
                c: Tensor(shape=torch.Size([12, 5]), device=cpu, dtype=torch.int64, is_shared=False)},
            batch_size=torch.Size([12]),
            device=cpu,
            is_shared=False),
        index: Tensor(shape=torch.Size([12]), device=cpu, dtype=torch.int64, is_shared=False)},
    batch_size=torch.Size([12]),
    device=cpu,
    is_shared=False)
我们的样本现在有一个额外的 "index" 键,用于指示采样的索引。
让我们看看这些索引:
print(sample["index"])
tensor([2, 1, 2, 1, 0, 0, 1, 2, 0, 0, 0, 2])
与tensorclass的集成
ReplayBuffer 类及其相关子类也原生支持 tensorclass 类,这些类可以方便地用于以更明确的方式编码数据集:
from tensordict import tensorclass


@tensorclass
class MyData:
    images: torch.Tensor
    labels: torch.Tensor


data = MyData(
    images=torch.randint(
        255,
        (10, 64, 64, 3),
    ),
    labels=torch.randint(100, (10,)),
    batch_size=[10],
)

tempdir = tempfile.TemporaryDirectory()
buffer_lazymemmap = ReplayBuffer(
    storage=LazyMemmapStorage(size, scratch_dir=tempdir), batch_size=12
)
buffer_lazymemmap.extend(data)
print(f"The buffer has {len(buffer_lazymemmap)} elements")
sample = buffer_lazymemmap.sample()
print("sample:", sample)
The buffer has 10 elements
sample: MyData(
    images=Tensor(shape=torch.Size([12, 64, 64, 3]), device=cpu, dtype=torch.int64, is_shared=False),
    labels=Tensor(shape=torch.Size([12]), device=cpu, dtype=torch.int64, is_shared=False),
    batch_size=torch.Size([12]),
    device=cpu,
    is_shared=False)
正如预期。数据具有正确的类别和形状!
与其他张量结构(PyTrees)的集成
TorchRL的重放缓冲区也可以与任何pytree数据结构一起工作。
PyTree是一种由字典、列表和/或元组组成的嵌套结构,其叶子是张量。
这意味着可以将任何这样的树结构存储在连续内存中!
可以使用各种存储:
TensorStorage,
LazyMemmapStorage
或 LazyTensorStorage 都接受这种
类型的数据。
这里是一个简短的演示,展示这个功能的样子:
from torch.utils._pytree import tree_map
让我们在磁盘上构建重放缓冲区:
rb = ReplayBuffer(storage=LazyMemmapStorage(size))
data = {
    "a": torch.randn(3),
    "b": {"c": (torch.zeros(2), [torch.ones(1)])},
    30: -torch.ones(()),  # non-string keys also work
}
rb.add(data)

# The sample has a similar structure to the data (with a leading dimension of 10 for each tensor)
sample = rb.sample(10)
使用 pytrees,任何可调用的对象都可以用作转换:
def transform(x):
    # Zeros all the data in the pytree
    return tree_map(lambda y: y * 0, x)


rb.append_transform(transform)
sample = rb.sample(batch_size=12)
让我们检查一下我们的转换是否完成了任务:
def assert0(x):
    assert (x == 0).all()


tree_map(assert0, sample)
{'a': None, 'b': {'c': (None, [None])}, 30: None}
采样和迭代缓冲区
重放缓冲区支持多种采样策略:
如果批处理大小是固定的,且可在构造时定义,则可将其作为关键字参数传递给缓冲区;
在固定批处理大小的情况下,可对重放缓冲区进行迭代以收集样本;
如果批处理大小是动态的,可以将其传递给
sample方法 即时。
采样可以使用多线程实现,但这与最后一种选项不兼容(因为它要求缓冲区预先知道下一个批次的大小)。
让我们来看几个例子:
固定批次大小
如果在构造时已传入批量大小(batch-size),则在采样时应省略该参数:
data = MyData(
    images=torch.randint(
        255,
        (200, 64, 64, 3),
    ),
    labels=torch.randint(100, (200,)),
    batch_size=[200],
)

buffer_lazymemmap = ReplayBuffer(storage=LazyMemmapStorage(size), batch_size=128)
buffer_lazymemmap.extend(data)
buffer_lazymemmap.sample()
MyData(
    images=Tensor(shape=torch.Size([128, 64, 64, 3]), device=cpu, dtype=torch.int64, is_shared=False),
    labels=Tensor(shape=torch.Size([128]), device=cpu, dtype=torch.int64, is_shared=False),
    batch_size=torch.Size([128]),
    device=cpu,
    is_shared=False)
这批数据的大小正是我们想要的(128)。
要启用多线程采样,只需在构造时将一个正整数传递给
prefetch 关键字参数。这应该在采样耗时的情况下显著提高采样的速度(例如,在使用优先级采样器时):
buffer_lazymemmap = ReplayBuffer(
    storage=LazyMemmapStorage(size), batch_size=128, prefetch=10
)  # creates a queue of 10 elements to be prefetched in the background
buffer_lazymemmap.extend(data)
print(buffer_lazymemmap.sample())
MyData(
    images=Tensor(shape=torch.Size([128, 64, 64, 3]), device=cpu, dtype=torch.int64, is_shared=False),
    labels=Tensor(shape=torch.Size([128]), device=cpu, dtype=torch.int64, is_shared=False),
    batch_size=torch.Size([128]),
    device=cpu,
    is_shared=False)
使用固定批次大小迭代缓冲区
我们还可以像使用常规数据加载器(dataloader)一样对缓冲区(buffer)进行迭代,前提是批处理大小(batch-size)已预先定义:
for i, data in enumerate(buffer_lazymemmap):
    if i == 3:
        print(data)
        break
MyData(
    images=Tensor(shape=torch.Size([128, 64, 64, 3]), device=cpu, dtype=torch.int64, is_shared=False),
    labels=Tensor(shape=torch.Size([128]), device=cpu, dtype=torch.int64, is_shared=False),
    batch_size=torch.Size([128]),
    device=cpu,
    is_shared=False)
由于我们的采样技术完全是随机的并且不防止重复,因此所讨论的迭代器是无限的。但是,我们可以使用
SamplerWithoutReplacement
代替,这将把我们的缓冲区转换为有限的迭代器:
from torchrl.data.replay_buffers.samplers import SamplerWithoutReplacement

buffer_lazymemmap = ReplayBuffer(
    storage=LazyMemmapStorage(size), batch_size=32, sampler=SamplerWithoutReplacement()
)
我们创建的数据足够大,可以获取几个样本
data = TensorDict(
    {
        "a": torch.arange(64).view(16, 4),
        ("b", "c"): torch.arange(128).view(16, 8),
    },
    batch_size=[16],
)

buffer_lazymemmap.extend(data)
for _i, _ in enumerate(buffer_lazymemmap):
    continue
print(f"A total of {_i+1} batches have been collected")
A total of 1 batches have been collected
动态批量大小
与我们之前看到的不同,batch_size 关键字参数可以省略,并直接传递给 sample 方法:
buffer_lazymemmap = ReplayBuffer(
    storage=LazyMemmapStorage(size), sampler=SamplerWithoutReplacement()
)
buffer_lazymemmap.extend(data)
print("sampling 3 elements:", buffer_lazymemmap.sample(3))
print("sampling 5 elements:", buffer_lazymemmap.sample(5))
sampling 3 elements: TensorDict(
    fields={
        a: Tensor(shape=torch.Size([3, 4]), device=cpu, dtype=torch.int64, is_shared=False),
        b: TensorDict(
            fields={
                c: Tensor(shape=torch.Size([3, 8]), device=cpu, dtype=torch.int64, is_shared=False)},
            batch_size=torch.Size([3]),
            device=cpu,
            is_shared=False)},
    batch_size=torch.Size([3]),
    device=cpu,
    is_shared=False)
sampling 5 elements: TensorDict(
    fields={
        a: Tensor(shape=torch.Size([5, 4]), device=cpu, dtype=torch.int64, is_shared=False),
        b: TensorDict(
            fields={
                c: Tensor(shape=torch.Size([5, 8]), device=cpu, dtype=torch.int64, is_shared=False)},
            batch_size=torch.Size([5]),
            device=cpu,
            is_shared=False)},
    batch_size=torch.Size([5]),
    device=cpu,
    is_shared=False)
优先级重放缓冲区
TorchRL 还提供了用于优先经验回放缓冲区的接口。 该缓冲区类会根据传入数据的优先级信号对数据进行采样。
尽管此工具兼容非 TensorDict 数据,但我们仍建议使用 TensorDict,因为它能以极少的额外工作量在缓冲区中携带元数据进出。
让我们首先看看如何在通用情况下构建优先级重放缓冲区。\(\alpha\) 和 \(\beta\) 超参数需要手动设置:
from torchrl.data.replay_buffers.samplers import PrioritizedSampler

size = 100

rb = ReplayBuffer(
    storage=ListStorage(size),
    sampler=PrioritizedSampler(max_capacity=size, alpha=0.8, beta=1.1),
    collate_fn=lambda x: x,
)
扩展重放缓冲区会返回各项的索引,我们稍后将利用这些索引来更新优先级:
indices = rb.extend([1, "foo", None])
采样器要求每个元素都具有一个优先级。当元素被添加到缓冲区时,其优先级被设为默认值 1。一旦优先级被计算出来(通常通过损失函数),就必须在缓冲区中更新该优先级。
这是通过update_priority()方法完成的,该方法需要索引以及优先级。
我们为数据集中的第二个样本分配一个人为的高优先级,
以观察其对采样的影响:
rb.update_priority(index=indices, priority=torch.tensor([0, 1_000, 0.1]))
我们观察到从缓冲区采样返回的主要是第二个样本
("foo"):
sample, info = rb.sample(10, return_info=True)
print(sample)
['foo', 'foo', 'foo', 'foo', 'foo', 'foo', 'foo', 'foo', 'foo', 'foo']
信息包含项目的相对权重以及索引。
print(info)
{'_weight': tensor([2.0893e-10, 2.0893e-10, 2.0893e-10, 2.0893e-10, 2.0893e-10, 2.0893e-10,
        2.0893e-10, 2.0893e-10, 2.0893e-10, 2.0893e-10]), 'index': tensor([1, 1, 1, 1, 1, 1, 1, 1, 1, 1])}
我们发现,与普通经验回放缓冲区相比,使用优先级经验回放缓冲区需要在训练循环中增加一系列额外步骤:
在收集数据并扩展缓冲区后,必须更新各项的优先级;
在计算损失并从中获得“优先级信号”后,我们必须再次更新缓冲区中各项的优先级。 这要求我们持续跟踪索引。
这极大地阻碍了缓冲区的可重用性:如果要编写一个训练脚本,使其既能创建优先级缓冲区,也能创建普通缓冲区,则必须添加大量控制流逻辑,以确保仅在使用优先级缓冲区时,才在恰当的位置调用相应的方法。
让我们看看如何通过 TensorDict 来改进这一点。
我们看到 TensorDictReplayBuffer 返回带有其相对存储索引的数据。
我们没有提到的一个特性是,这个类还确保优先级信号在扩展期间自动解析到优先级采样器(如果存在的话)。
这些特性的组合以多种方式简化了操作: - 扩展缓冲区时,优先级信号将自动
parsed if present and the priority will accurately be assigned;
索引将被存储在采样的 tensordict 中,从而便于在损失计算后更新优先级。
计算损失时,优先级信号将被注册到传递给损失模块的 tensordict 中,从而无需额外操作即可更新权重:
>>> data = replay_buffer.sample()
>>> loss_val = loss_module(data)
>>> replay_buffer.update_tensordict_priority(data)
以下代码演示了这些概念。我们构建了一个带有优先级采样器的回放缓冲区,并在构造函数中指明应从哪个条目中获取优先级信号:
rb = TensorDictReplayBuffer(
    storage=ListStorage(size),
    sampler=PrioritizedSampler(size, alpha=0.8, beta=1.1),
    priority_key="td_error",
    batch_size=1024,
)
让我们选择一个与存储索引成比例的优先信号:
data["td_error"] = torch.arange(data.numel())

rb.extend(data)

sample = rb.sample()
较高的索引应更频繁地出现:
from matplotlib import pyplot as plt

plt.hist(sample["index"].numpy())

(array([160., 61., 118., 64., 129., 62., 111., 61., 139., 119.]), array([ 0. , 1.5, 3. , 4.5, 6. , 7.5, 9. , 10.5, 12. , 13.5, 15. ]), <BarContainer object of 10 artists>)
一旦我们处理了样本,我们将使用torchrl.data.TensorDictReplayBuffer.update_tensordict_priority()方法更新优先级键。
为了展示这是如何工作的,让我们恢复采样项目的优先级:
sample = rb.sample()
sample["td_error"] = data.numel() - sample["index"]
rb.update_tensordict_priority(sample)
现在,较高的索引应该较少出现:
sample = rb.sample()
from matplotlib import pyplot as plt

plt.hist(sample["index"].numpy())
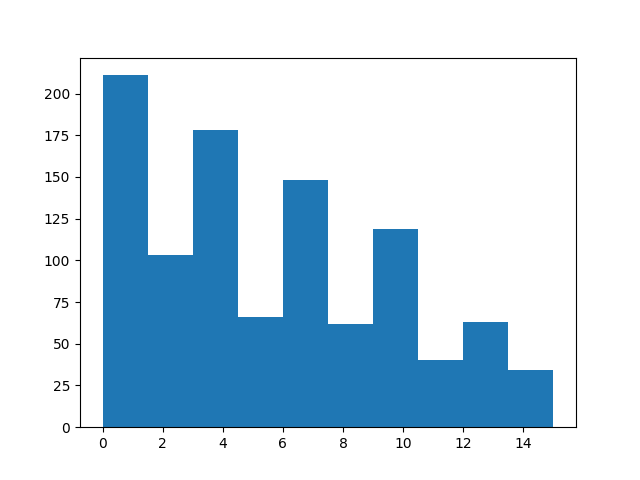
(array([211., 103., 178., 66., 148., 62., 119., 40., 63., 34.]), array([ 0. , 1.5, 3. , 4.5, 6. , 7.5, 9. , 10.5, 12. , 13.5, 15. ]), <BarContainer object of 10 artists>)
使用变换
存储在重放缓冲区中的数据可能尚未准备好呈现给损失模块。
在某些情况下,收集器生成的数据可能太大而无法直接保存。例如,将图像从 uint8 转换为浮点张量,或者在使用决策变换器时拼接连续帧。
只需向缓冲区添加适当的变换,即可在缓冲区内/外处理数据。 以下是几个示例:
保存原始图像
uint8-typed tensors 相比之下占用的内存要少得多,通常我们为模型提供的浮点张量。出于这个原因,保存原始图像可能是有用的。
以下脚本展示了如何构建一个收集器,该收集器仅返回原始图像但在推理时使用转换后的图像,以及这些转换如何在重放缓冲区中重复使用:
from torchrl.collectors import SyncDataCollector
from torchrl.envs.libs.gym import GymEnv
from torchrl.envs.transforms import (
    Compose,
    GrayScale,
    Resize,
    ToTensorImage,
    TransformedEnv,
)
from torchrl.envs.utils import RandomPolicy

env = TransformedEnv(
    GymEnv("CartPole-v1", from_pixels=True),
    Compose(
        ToTensorImage(in_keys=["pixels"], out_keys=["pixels_trsf"]),
        Resize(in_keys=["pixels_trsf"], w=64, h=64),
        GrayScale(in_keys=["pixels_trsf"]),
    ),
)
让我们来看一个展开:
print(env.rollout(3))
TensorDict(
    fields={
        action: Tensor(shape=torch.Size([3, 2]), device=cpu, dtype=torch.int64, is_shared=False),
        done: Tensor(shape=torch.Size([3, 1]), device=cpu, dtype=torch.bool, is_shared=False),
        next: TensorDict(
            fields={
                done: Tensor(shape=torch.Size([3, 1]), device=cpu, dtype=torch.bool, is_shared=False),
                pixels: Tensor(shape=torch.Size([3, 400, 600, 3]), device=cpu, dtype=torch.uint8, is_shared=False),
                pixels_trsf: Tensor(shape=torch.Size([3, 1, 64, 64]), device=cpu, dtype=torch.float32, is_shared=False),
                reward: Tensor(shape=torch.Size([3, 1]), device=cpu, dtype=torch.float32, is_shared=False),
                terminated: Tensor(shape=torch.Size([3, 1]), device=cpu, dtype=torch.bool, is_shared=False),
                truncated: Tensor(shape=torch.Size([3, 1]), device=cpu, dtype=torch.bool, is_shared=False)},
            batch_size=torch.Size([3]),
            device=None,
            is_shared=False),
        pixels: Tensor(shape=torch.Size([3, 400, 600, 3]), device=cpu, dtype=torch.uint8, is_shared=False),
        pixels_trsf: Tensor(shape=torch.Size([3, 1, 64, 64]), device=cpu, dtype=torch.float32, is_shared=False),
        terminated: Tensor(shape=torch.Size([3, 1]), device=cpu, dtype=torch.bool, is_shared=False),
        truncated: Tensor(shape=torch.Size([3, 1]), device=cpu, dtype=torch.bool, is_shared=False)},
    batch_size=torch.Size([3]),
    device=None,
    is_shared=False)
我们刚刚创建了一个生成像素的环境。这些图像 经过处理后,将被输入策略网络(policy)。 我们希望保存原始图像,而非其变换后的结果。 为此,我们将向采集器(collector)添加一个变换操作,以选择我们希望显示的键:
from torchrl.envs.transforms import ExcludeTransform

collector = SyncDataCollector(
    env,
    RandomPolicy(env.action_spec),
    frames_per_batch=10,
    total_frames=1000,
    postproc=ExcludeTransform("pixels_trsf", ("next", "pixels_trsf"), "collector"),
)
让我们查看一批数据,并确认"pixels_trsf"键已被丢弃:
for data in collector:
    print(data)
    break
TensorDict(
    fields={
        action: Tensor(shape=torch.Size([10, 2]), device=cpu, dtype=torch.int64, is_shared=False),
        done: Tensor(shape=torch.Size([10, 1]), device=cpu, dtype=torch.bool, is_shared=False),
        next: TensorDict(
            fields={
                done: Tensor(shape=torch.Size([10, 1]), device=cpu, dtype=torch.bool, is_shared=False),
                pixels: Tensor(shape=torch.Size([10, 400, 600, 3]), device=cpu, dtype=torch.uint8, is_shared=False),
                reward: Tensor(shape=torch.Size([10, 1]), device=cpu, dtype=torch.float32, is_shared=False),
                terminated: Tensor(shape=torch.Size([10, 1]), device=cpu, dtype=torch.bool, is_shared=False),
                truncated: Tensor(shape=torch.Size([10, 1]), device=cpu, dtype=torch.bool, is_shared=False)},
            batch_size=torch.Size([10]),
            device=None,
            is_shared=False),
        pixels: Tensor(shape=torch.Size([10, 400, 600, 3]), device=cpu, dtype=torch.uint8, is_shared=False),
        terminated: Tensor(shape=torch.Size([10, 1]), device=cpu, dtype=torch.bool, is_shared=False),
        truncated: Tensor(shape=torch.Size([10, 1]), device=cpu, dtype=torch.bool, is_shared=False)},
    batch_size=torch.Size([10]),
    device=None,
    is_shared=False)
我们创建一个具有与环境相同变换(transform)的回放缓冲区(replay buffer)。
但此处存在一个需要处理的细节:在不使用环境的情况下应用的变换对数据结构是无感知的。
当将变换添加到环境中时,"next" 层嵌套的 TensorDict 中的数据会首先被变换,然后在 rollout 执行过程中复制到根节点。而在处理静态数据时,情况并非如此。
尽管如此,我们的数据包含一个嵌套的 “next” TensorDict,如果我们未显式指示变换去处理它,该变换便会忽略此部分数据。
因此,我们需要手动将这些键添加到变换中:
t = Compose(
    ToTensorImage(
        in_keys=["pixels", ("next", "pixels")],
        out_keys=["pixels_trsf", ("next", "pixels_trsf")],
    ),
    Resize(in_keys=["pixels_trsf", ("next", "pixels_trsf")], w=64, h=64),
    GrayScale(in_keys=["pixels_trsf", ("next", "pixels_trsf")]),
)
rb = TensorDictReplayBuffer(storage=LazyMemmapStorage(1000), transform=t, batch_size=16)
rb.extend(data)
tensor([0, 1, 2, 3, 4, 5, 6, 7, 8, 9])
我们可以检查 sample 方法是否看到转换后的图像重新出现:
print(rb.sample())
TensorDict(
    fields={
        action: Tensor(shape=torch.Size([16, 2]), device=cpu, dtype=torch.int64, is_shared=False),
        done: Tensor(shape=torch.Size([16, 1]), device=cpu, dtype=torch.bool, is_shared=False),
        index: Tensor(shape=torch.Size([16]), device=cpu, dtype=torch.int64, is_shared=False),
        next: TensorDict(
            fields={
                done: Tensor(shape=torch.Size([16, 1]), device=cpu, dtype=torch.bool, is_shared=False),
                pixels: Tensor(shape=torch.Size([16, 400, 600, 3]), device=cpu, dtype=torch.uint8, is_shared=False),
                pixels_trsf: Tensor(shape=torch.Size([16, 1, 64, 64]), device=cpu, dtype=torch.float32, is_shared=False),
                reward: Tensor(shape=torch.Size([16, 1]), device=cpu, dtype=torch.float32, is_shared=False),
                terminated: Tensor(shape=torch.Size([16, 1]), device=cpu, dtype=torch.bool, is_shared=False),
                truncated: Tensor(shape=torch.Size([16, 1]), device=cpu, dtype=torch.bool, is_shared=False)},
            batch_size=torch.Size([16]),
            device=cpu,
            is_shared=False),
        pixels: Tensor(shape=torch.Size([16, 400, 600, 3]), device=cpu, dtype=torch.uint8, is_shared=False),
        pixels_trsf: Tensor(shape=torch.Size([16, 1, 64, 64]), device=cpu, dtype=torch.float32, is_shared=False),
        terminated: Tensor(shape=torch.Size([16, 1]), device=cpu, dtype=torch.bool, is_shared=False),
        truncated: Tensor(shape=torch.Size([16, 1]), device=cpu, dtype=torch.bool, is_shared=False)},
    batch_size=torch.Size([16]),
    device=cpu,
    is_shared=False)
一个更复杂的例子:使用CatFrames
The CatFrames 变换通过时间展开观察值,创建一个过去的事件记忆,使模型能够考虑过去的事件(在POMDP或具有循环策略如决策变换器的情况下)。存储这些连接的帧可能会消耗大量的内存。当n-back窗口在训练和推理期间需要不同(通常更长)时,这也可能是一个问题。我们通过在两个阶段分别执行CatFrames 变换来解决这个问题。
from torchrl.envs import CatFrames, UnsqueezeTransform
我们为返回基于像素观测值的环境创建一组标准的变换操作:
env = TransformedEnv(
    GymEnv("CartPole-v1", from_pixels=True),
    Compose(
        ToTensorImage(in_keys=["pixels"], out_keys=["pixels_trsf"]),
        Resize(in_keys=["pixels_trsf"], w=64, h=64),
        GrayScale(in_keys=["pixels_trsf"]),
        UnsqueezeTransform(-4, in_keys=["pixels_trsf"]),
        CatFrames(dim=-4, N=4, in_keys=["pixels_trsf"]),
    ),
)
collector = SyncDataCollector(
    env,
    RandomPolicy(env.action_spec),
    frames_per_batch=10,
    total_frames=1000,
)
for data in collector:
    print(data)
    break
TensorDict(
    fields={
        action: Tensor(shape=torch.Size([10, 2]), device=cpu, dtype=torch.int64, is_shared=False),
        collector: TensorDict(
            fields={
                traj_ids: Tensor(shape=torch.Size([10]), device=cpu, dtype=torch.int64, is_shared=False)},
            batch_size=torch.Size([10]),
            device=None,
            is_shared=False),
        done: Tensor(shape=torch.Size([10, 1]), device=cpu, dtype=torch.bool, is_shared=False),
        next: TensorDict(
            fields={
                done: Tensor(shape=torch.Size([10, 1]), device=cpu, dtype=torch.bool, is_shared=False),
                pixels: Tensor(shape=torch.Size([10, 400, 600, 3]), device=cpu, dtype=torch.uint8, is_shared=False),
                pixels_trsf: Tensor(shape=torch.Size([10, 4, 1, 64, 64]), device=cpu, dtype=torch.float32, is_shared=False),
                reward: Tensor(shape=torch.Size([10, 1]), device=cpu, dtype=torch.float32, is_shared=False),
                terminated: Tensor(shape=torch.Size([10, 1]), device=cpu, dtype=torch.bool, is_shared=False),
                truncated: Tensor(shape=torch.Size([10, 1]), device=cpu, dtype=torch.bool, is_shared=False)},
            batch_size=torch.Size([10]),
            device=None,
            is_shared=False),
        pixels: Tensor(shape=torch.Size([10, 400, 600, 3]), device=cpu, dtype=torch.uint8, is_shared=False),
        pixels_trsf: Tensor(shape=torch.Size([10, 4, 1, 64, 64]), device=cpu, dtype=torch.float32, is_shared=False),
        terminated: Tensor(shape=torch.Size([10, 1]), device=cpu, dtype=torch.bool, is_shared=False),
        truncated: Tensor(shape=torch.Size([10, 1]), device=cpu, dtype=torch.bool, is_shared=False)},
    batch_size=torch.Size([10]),
    device=None,
    is_shared=False)
缓冲区转换看起来很像环境转换,但具有额外的("next", ...)键,就像之前一样:
t = Compose(
    ToTensorImage(
        in_keys=["pixels", ("next", "pixels")],
        out_keys=["pixels_trsf", ("next", "pixels_trsf")],
    ),
    Resize(in_keys=["pixels_trsf", ("next", "pixels_trsf")], w=64, h=64),
    GrayScale(in_keys=["pixels_trsf", ("next", "pixels_trsf")]),
    UnsqueezeTransform(-4, in_keys=["pixels_trsf", ("next", "pixels_trsf")]),
    CatFrames(dim=-4, N=4, in_keys=["pixels_trsf", ("next", "pixels_trsf")]),
)
rb = TensorDictReplayBuffer(storage=LazyMemmapStorage(size), transform=t, batch_size=16)
data_exclude = data.exclude("pixels_trsf", ("next", "pixels_trsf"))
rb.add(data_exclude)
0
让我们从缓冲区中采样一个批次。变换后的像素键(pixel keys)的形状在从末尾开始的第4维上,长度应为4:
s = rb.sample(1)  # the buffer has only one element
print(s)
TensorDict(
    fields={
        action: Tensor(shape=torch.Size([1, 10, 2]), device=cpu, dtype=torch.int64, is_shared=False),
        collector: TensorDict(
            fields={
                traj_ids: Tensor(shape=torch.Size([1, 10]), device=cpu, dtype=torch.int64, is_shared=False)},
            batch_size=torch.Size([1, 10]),
            device=cpu,
            is_shared=False),
        done: Tensor(shape=torch.Size([1, 10, 1]), device=cpu, dtype=torch.bool, is_shared=False),
        index: Tensor(shape=torch.Size([1, 10]), device=cpu, dtype=torch.int64, is_shared=False),
        next: TensorDict(
            fields={
                done: Tensor(shape=torch.Size([1, 10, 1]), device=cpu, dtype=torch.bool, is_shared=False),
                pixels: Tensor(shape=torch.Size([1, 10, 400, 600, 3]), device=cpu, dtype=torch.uint8, is_shared=False),
                pixels_trsf: Tensor(shape=torch.Size([1, 10, 4, 1, 64, 64]), device=cpu, dtype=torch.float32, is_shared=False),
                reward: Tensor(shape=torch.Size([1, 10, 1]), device=cpu, dtype=torch.float32, is_shared=False),
                terminated: Tensor(shape=torch.Size([1, 10, 1]), device=cpu, dtype=torch.bool, is_shared=False),
                truncated: Tensor(shape=torch.Size([1, 10, 1]), device=cpu, dtype=torch.bool, is_shared=False)},
            batch_size=torch.Size([1, 10]),
            device=cpu,
            is_shared=False),
        pixels: Tensor(shape=torch.Size([1, 10, 400, 600, 3]), device=cpu, dtype=torch.uint8, is_shared=False),
        pixels_trsf: Tensor(shape=torch.Size([1, 10, 4, 1, 64, 64]), device=cpu, dtype=torch.float32, is_shared=False),
        terminated: Tensor(shape=torch.Size([1, 10, 1]), device=cpu, dtype=torch.bool, is_shared=False),
        truncated: Tensor(shape=torch.Size([1, 10, 1]), device=cpu, dtype=torch.bool, is_shared=False)},
    batch_size=torch.Size([1, 10]),
    device=cpu,
    is_shared=False)
经过一些处理(例如排除未使用的键等)后,我们发现在线生成的数据与离线生成的数据一致!
assert (data.exclude("collector") == s.squeeze(0).exclude("index", "collector")).all()
存储轨迹
在许多情况下,我们希望从缓冲区中获取轨迹(trajectories),而不仅仅是简单的转移(transitions)。TorchRL 提供了多种实现这一目标的方法。
目前推荐的方式是将轨迹数据沿缓冲区的第一维存储,并使用 SliceSampler 来采样这些数据批次。该类仅需了解您数据结构中的少量信息即可完成其工作(请注意:当前它仅支持以 TensorDict 结构组织的数据):包括切片数量或每个切片的长度,以及关于各幕(episode)之间分隔位置的信息(例如,请回顾,在使用 DataCollector 时,轨迹 ID 存储于 ("collector", "traj_ids") 中)。在此简单示例中,我们构建了包含 4 段连续短轨迹的数据,并从中采样出 4 个切片,每个切片长度为 2(因为批次大小为 8,而 8 个样本 ÷ 4 个切片 = 每个切片含 2 个时间步)。同时,我们也对各时间步进行了标记。
from torchrl.data import SliceSampler

rb = TensorDictReplayBuffer(
    storage=LazyMemmapStorage(size),
    sampler=SliceSampler(traj_key="episode", num_slices=4),
    batch_size=8,
)
episode = torch.zeros(10, dtype=torch.int)
episode[:3] = 1
episode[3:5] = 2
episode[5:7] = 3
episode[7:] = 4
steps = torch.cat([torch.arange(3), torch.arange(2), torch.arange(2), torch.arange(3)])
data = TensorDict(
    {
        "episode": episode,
        "obs": torch.randn((3, 4, 5)).expand(10, 3, 4, 5),
        "act": torch.randn((20,)).expand(10, 20),
        "other": torch.randn((20, 50)).expand(10, 20, 50),
        "steps": steps,
    },
    [10],
)
rb.extend(data)
sample = rb.sample()
print("episode are grouped", sample["episode"])
print("steps are successive", sample["steps"])
episode are grouped tensor([2, 2, 3, 3, 1, 1, 3, 3], dtype=torch.int32)
steps are successive tensor([0, 1, 0, 1, 1, 2, 0, 1])
结论
我们已经了解了重放缓冲区(replay buffer)在 TorchRL 中的使用方式,从最简单的用法到更高级的用法——在这些高级用法中,数据需要被转换或以特定方式存储。 你现在应当能够:
创建一个重放缓冲区,自定义其存储、采样器和变换;
为您的问题选择最佳的存储类型(列表、内存或基于磁盘);
最小化缓冲区的内存占用。
下一步
查看数据 API 参考文档,了解 TorchRL 中基于我们重放缓冲区(Replay Buffer)API 的离线数据集;
检查其他采样器,如
SamplerWithoutReplacement,PrioritizedSliceSampler和SliceSamplerWithoutReplacement,或其他写入器 如TensorDictMaxValueWriter。查看如何在文档中对ReplayBuffers进行检查点保存。
脚本总运行时间: (2 分钟 55.642 秒)
估计内存使用量: 491 MB