注意
点击 这里 下载完整示例代码
使用NVDEC加速视频解码
作者: Moto Hira
本教程展示了如何在 TorchAudio 中使用 NVIDIA 的硬件视频解码器(NVDEC),以及它如何提升视频解码的性能。
import torch
import torchaudio

print(torch.__version__)
print(torchaudio.__version__)
2.1.1
2.1.0
import os
import time

import matplotlib.pyplot as plt
from torchaudio.io import StreamReader
检查先决条件
首先,我们检查 TorchAudio 是否能正确检测到支持硬件解码器/编码器的 FFmpeg 库。
from torchaudio.utils import ffmpeg_utils
FFmpeg Library versions:
  libavcodec:   60.3.100
  libavdevice:  60.1.100
  libavfilter:  9.3.100
  libavformat:  60.3.100
  libavutil:    58.2.100
Available NVDEC Decoders:
 - av1_cuvid
 - h264_cuvid
 - hevc_cuvid
 - mjpeg_cuvid
 - mpeg1_cuvid
 - mpeg2_cuvid
 - mpeg4_cuvid
 - vc1_cuvid
 - vp8_cuvid
 - vp9_cuvid
print("Avaialbe GPU:")
print(torch.cuda.get_device_properties(0))
Avaialbe GPU:
_CudaDeviceProperties(name='NVIDIA A10G', major=8, minor=6, total_memory=22515MB, multi_processor_count=80)
我们将使用以下视频,该视频具有以下属性;
编解码器:H.264
分辨率:960x540
FPS: 29.97
像素格式:YUV420P
src = torchaudio.utils.download_asset(
    "tutorial-assets/stream-api/NASAs_Most_Scientifically_Complex_Space_Observatory_Requires_Precision-MP4_small.mp4"
)
  0%|          | 0.00/31.8M [00:00<?, ?B/s]
100%|##########| 31.8M/31.8M [00:00<00:00, 423MB/s]
使用NVDEC解码视频
要使用硬件视频解码器,您需要在定义输出视频流时指定硬件解码器,方法是将 decoder 选项传递给
add_video_stream() 方法。
s = StreamReader(src)
s.add_video_stream(5, decoder="h264_cuvid")
s.fill_buffer()
(video,) = s.pop_chunks()
视频帧会被解码并以 NCHW 格式返回为张量。
print(video.shape, video.dtype)
torch.Size([5, 3, 540, 960]) torch.uint8
默认情况下,解码后的帧会被发送回 CPU 内存,并创建 CPU 张量。
print(video.device)
cpu
通过指定 hw_accel 选项,你可以将解码的帧转换为 CUDA 张量。
hw_accel 选项接受字符串值并将其传递给
torch.device。
注意
目前,hw_accel 选项与
add_basic_video_stream()
不兼容。add_basic_video_stream 添加了后解码处理流程,专为 CPU 内存中的帧设计。
请使用 add_video_stream()。
s = StreamReader(src)
s.add_video_stream(5, decoder="h264_cuvid", hw_accel="cuda:0")
s.fill_buffer()
(video,) = s.pop_chunks()

print(video.shape, video.dtype, video.device)
torch.Size([5, 3, 540, 960]) torch.uint8 cuda:0
注意
当有多个GPU可用时,StreamReader 默认使用第一个GPU。你可以通过提供
"gpu" 选项来更改此设置。
# Video data is sent to CUDA device 0, decoded and
# converted on the same device.
s.add_video_stream(
    ...,
    decoder="h264_cuvid",
    decoder_option={"gpu": "0"},
    hw_accel="cuda:0",
)
注意
"gpu" 选项和 hw_accel 选项可以独立指定。
如果它们不匹配,解码的帧会自动传输到由 hw_accell 指定的设备上。
# Video data is sent to CUDA device 0, and decoded there.
# Then it is transfered to CUDA device 1, and converted to
# CUDA tensor.
s.add_video_stream(
    ...,
    decoder="h264_cuvid",
    decoder_option={"gpu": "0"},
    hw_accel="cuda:1",
)
可视化
让我们看一下由硬件解码器解码的帧,并将其与软件解码器得到的等效结果进行比较。
以下函数会查找给定的时间戳,并使用指定的解码器解码一帧数据。
def test_decode(decoder: str, seek: float):
    s = StreamReader(src)
    s.seek(seek)
    s.add_video_stream(1, decoder=decoder)
    s.fill_buffer()
    (video,) = s.pop_chunks()
    return video[0]
timestamps = [12, 19, 45, 131, 180]

cpu_frames = [test_decode(decoder="h264", seek=ts) for ts in timestamps]
cuda_frames = [test_decode(decoder="h264_cuvid", seek=ts) for ts in timestamps]
注意
目前,硬件解码器不支持颜色空间转换。 解码后的帧为 YUV 格式。 以下函数执行 YUV 到 RGB 转换 (以及用于绘图的轴重新排列)。
def yuv_to_rgb(frames):
    frames = frames.cpu().to(torch.float)
    y = frames[..., 0, :, :]
    u = frames[..., 1, :, :]
    v = frames[..., 2, :, :]

    y /= 255
    u = u / 255 - 0.5
    v = v / 255 - 0.5

    r = y + 1.14 * v
    g = y + -0.396 * u - 0.581 * v
    b = y + 2.029 * u

    rgb = torch.stack([r, g, b], -1)
    rgb = (rgb * 255).clamp(0, 255).to(torch.uint8)
    return rgb.numpy()
现在我们来可视化结果。
def plot():
    n_rows = len(timestamps)
    fig, axes = plt.subplots(n_rows, 2, figsize=[12.8, 16.0])
    for i in range(n_rows):
        axes[i][0].imshow(yuv_to_rgb(cpu_frames[i]))
        axes[i][1].imshow(yuv_to_rgb(cuda_frames[i]))

    axes[0][0].set_title("Software decoder")
    axes[0][1].set_title("HW decoder")
    plt.setp(axes, xticks=[], yticks=[])
    plt.tight_layout()


plot()
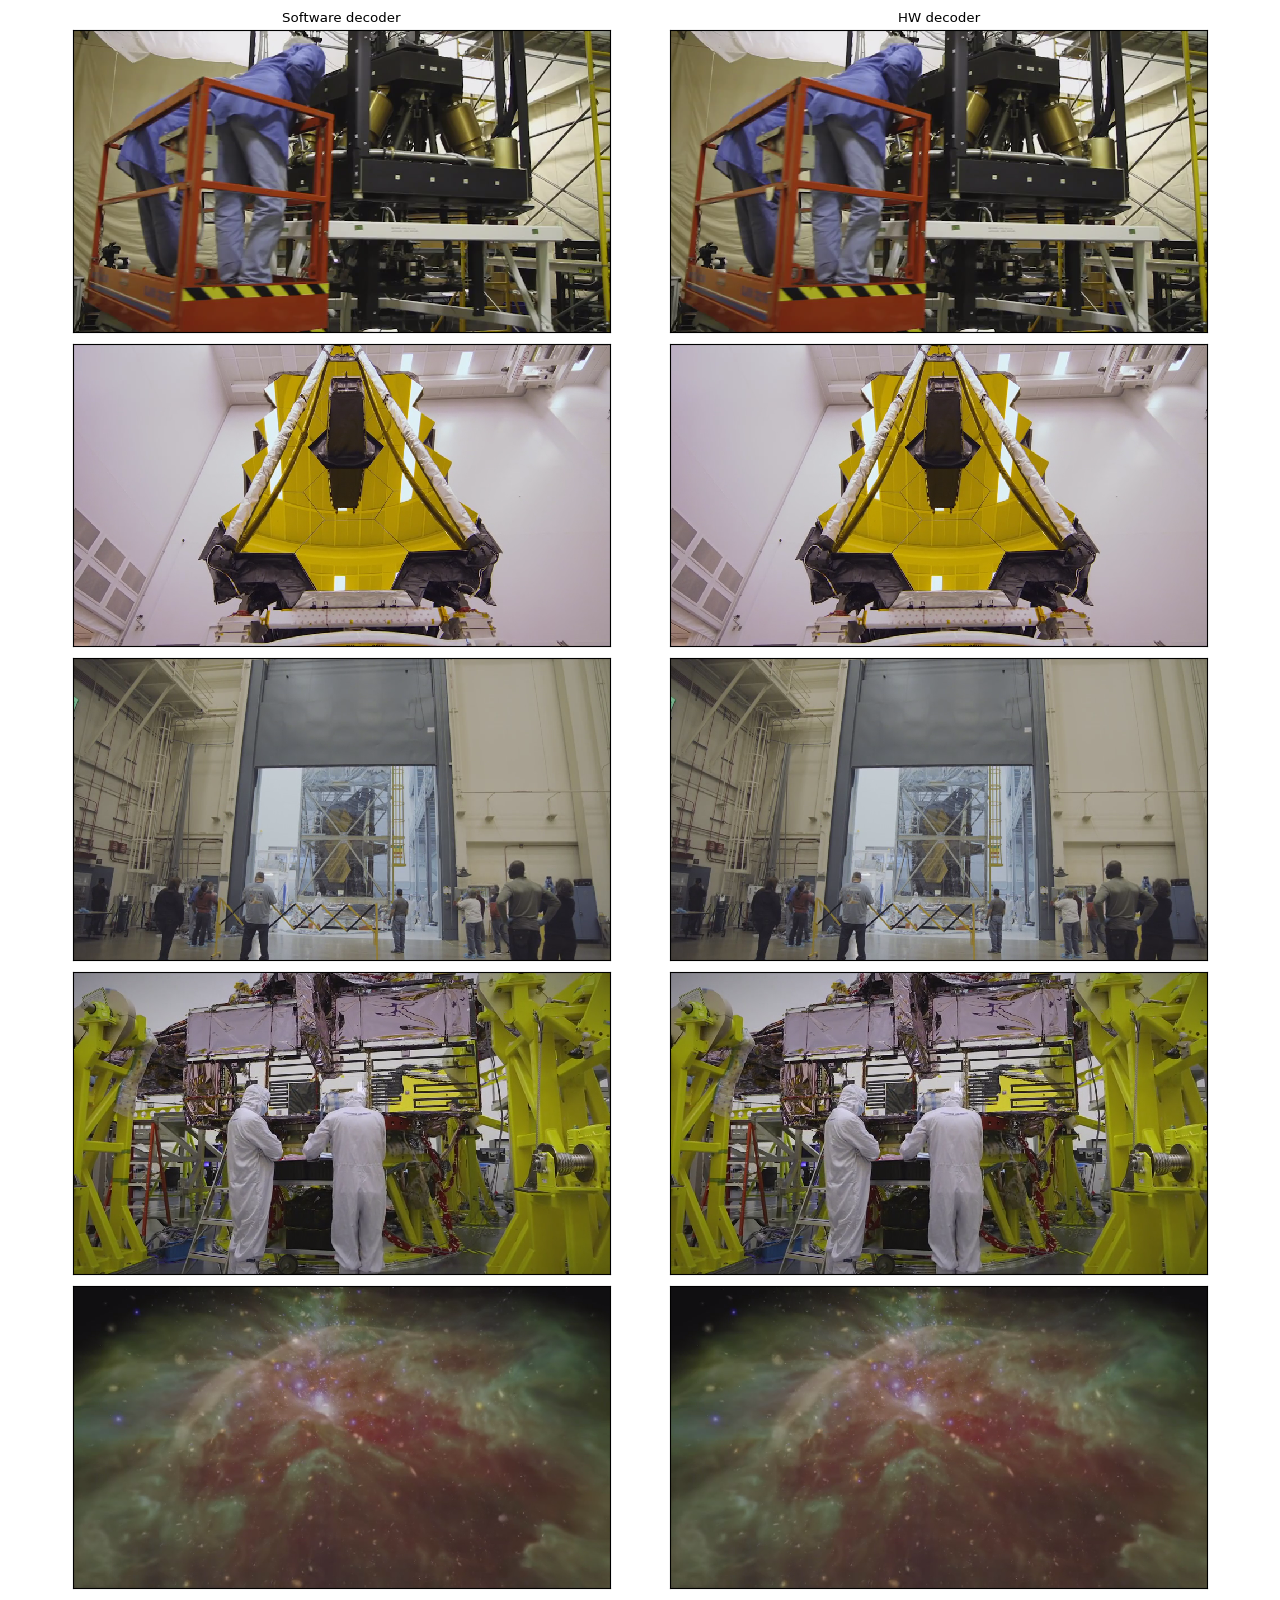
在作者看来,它们是无法区分的。 如果你发现了什么,请随时告诉我们。 :)
HW 调整大小和裁剪
你可以使用 decoder_option 参数来提供解码器特定的
选项。
以下选项在预处理过程中通常相关。
resize: 将帧调整为(width)x(height)。crop: 裁剪帧(top)x(bottom)x(left)x(right). 请注意,指定的值是移除的行数/列数。 最终图像大小为(width - left - right)x(height - top -bottom). 如果同时使用crop和resize选项, 将首先执行crop。
对于其他可用选项,请运行
ffmpeg -h decoder=h264_cuvid。
def test_options(option):
    s = StreamReader(src)
    s.seek(87)
    s.add_video_stream(1, decoder="h264_cuvid", hw_accel="cuda:0", decoder_option=option)
    s.fill_buffer()
    (video,) = s.pop_chunks()
    print(f"Option: {option}:\t{video.shape}")
    return video[0]
original = test_options(option=None)
resized = test_options(option={"resize": "480x270"})
cropped = test_options(option={"crop": "135x135x240x240"})
cropped_and_resized = test_options(option={"crop": "135x135x240x240", "resize": "640x360"})
Option: None:   torch.Size([1, 3, 540, 960])
Option: {'resize': '480x270'}:  torch.Size([1, 3, 270, 480])
Option: {'crop': '135x135x240x240'}:    torch.Size([1, 3, 270, 480])
Option: {'crop': '135x135x240x240', 'resize': '640x360'}:       torch.Size([1, 3, 360, 640])
def plot():
    fig, axes = plt.subplots(2, 2, figsize=[12.8, 9.6])
    axes[0][0].imshow(yuv_to_rgb(original))
    axes[0][1].imshow(yuv_to_rgb(resized))
    axes[1][0].imshow(yuv_to_rgb(cropped))
    axes[1][1].imshow(yuv_to_rgb(cropped_and_resized))

    axes[0][0].set_title("Original")
    axes[0][1].set_title("Resized")
    axes[1][0].set_title("Cropped")
    axes[1][1].set_title("Cropped and resized")
    plt.tight_layout()
    return fig


plot()
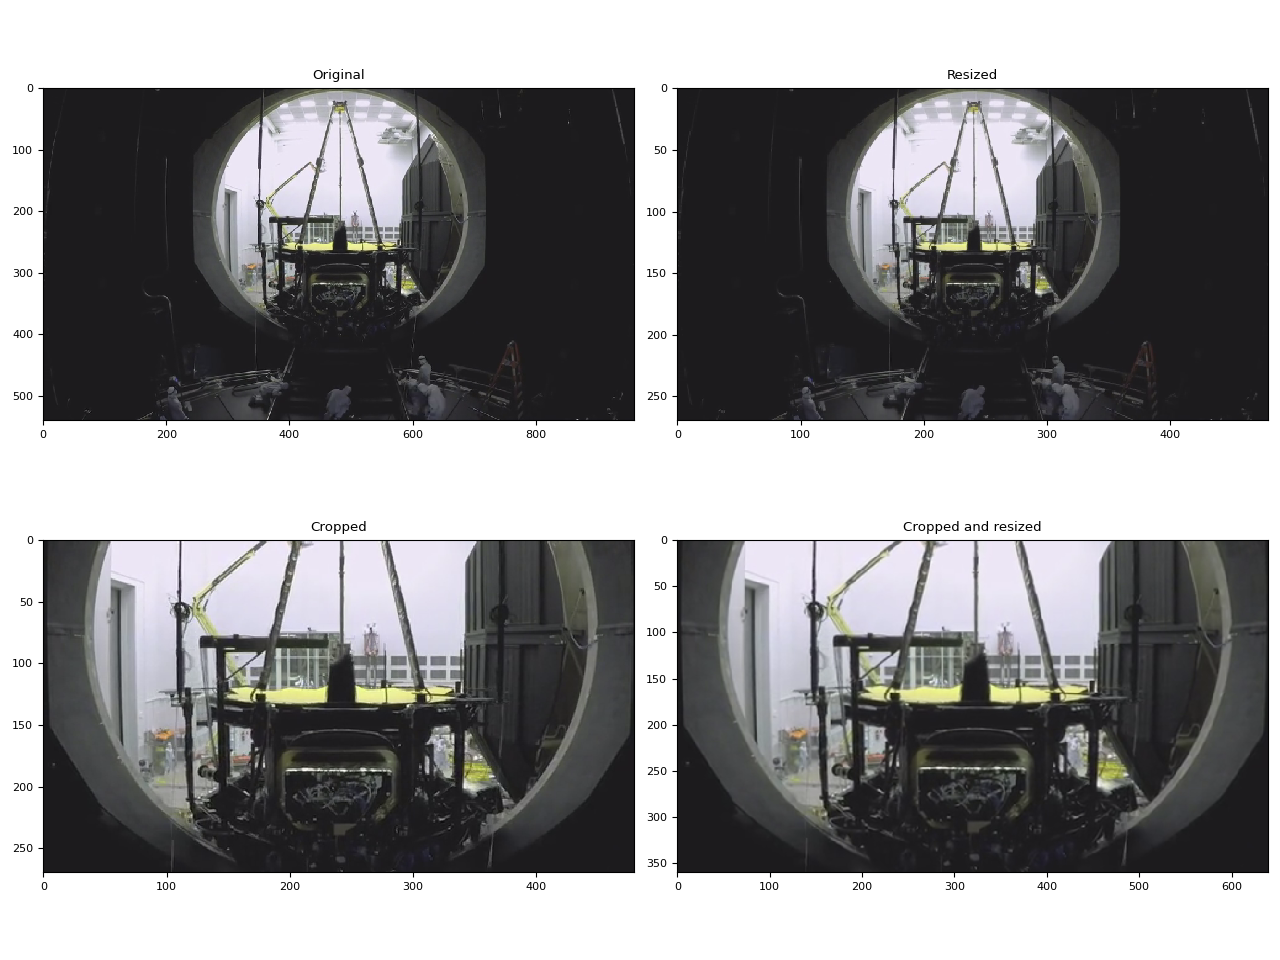
<Figure size 1280x960 with 4 Axes>
比较缩放方法
与软件缩放不同,NVDEC 没有提供选择缩放算法的选项。 在机器学习应用中,通常需要构建一个具有类似数值特性的预处理管道。 因此,这里我们比较了硬件缩放与不同算法软件缩放的结果。
我们将使用以下视频,该视频包含通过以下命令生成的测试图案。
ffmpeg -y -f lavfi -t 12.05 -i mptestsrc -movflags +faststart mptestsrc.mp4
test_src = torchaudio.utils.download_asset("tutorial-assets/mptestsrc.mp4")
  0%|          | 0.00/232k [00:00<?, ?B/s]
100%|##########| 232k/232k [00:00<00:00, 120MB/s]
以下函数用于解码视频并 应用指定的缩放算法。
def decode_resize_ffmpeg(mode, height, width, seek):
    filter_desc = None if mode is None else f"scale={width}:{height}:sws_flags={mode}"
    s = StreamReader(test_src)
    s.add_video_stream(1, filter_desc=filter_desc)
    s.seek(seek)
    s.fill_buffer()
    (chunk,) = s.pop_chunks()
    return chunk
以下函数使用 HW 解码器对视频进行解码和调整大小。
def decode_resize_cuvid(height, width, seek):
    s = StreamReader(test_src)
    s.add_video_stream(1, decoder="h264_cuvid", decoder_option={"resize": f"{width}x{height}"}, hw_accel="cuda:0")
    s.seek(seek)
    s.fill_buffer()
    (chunk,) = s.pop_chunks()
    return chunk.cpu()
现在我们执行它们并可视化生成的帧。
params = {"height": 224, "width": 224, "seek": 3}

frames = [
    decode_resize_ffmpeg(None, **params),
    decode_resize_ffmpeg("neighbor", **params),
    decode_resize_ffmpeg("bilinear", **params),
    decode_resize_ffmpeg("bicubic", **params),
    decode_resize_cuvid(**params),
    decode_resize_ffmpeg("spline", **params),
    decode_resize_ffmpeg("lanczos:param0=1", **params),
    decode_resize_ffmpeg("lanczos:param0=3", **params),
    decode_resize_ffmpeg("lanczos:param0=5", **params),
]
def plot():
    fig, axes = plt.subplots(3, 3, figsize=[12.8, 15.2])
    for i, f in enumerate(frames):
        h, w = f.shape[2:4]
        f = f[..., : h // 4, : w // 4]
        axes[i // 3][i % 3].imshow(yuv_to_rgb(f[0]))
    axes[0][0].set_title("Original")
    axes[0][1].set_title("nearest neighbor")
    axes[0][2].set_title("bilinear")
    axes[1][0].set_title("bicubic")
    axes[1][1].set_title("NVDEC")
    axes[1][2].set_title("spline")
    axes[2][0].set_title("lanczos(1)")
    axes[2][1].set_title("lanczos(3)")
    axes[2][2].set_title("lanczos(5)")

    plt.setp(axes, xticks=[], yticks=[])
    plt.tight_layout()


plot()
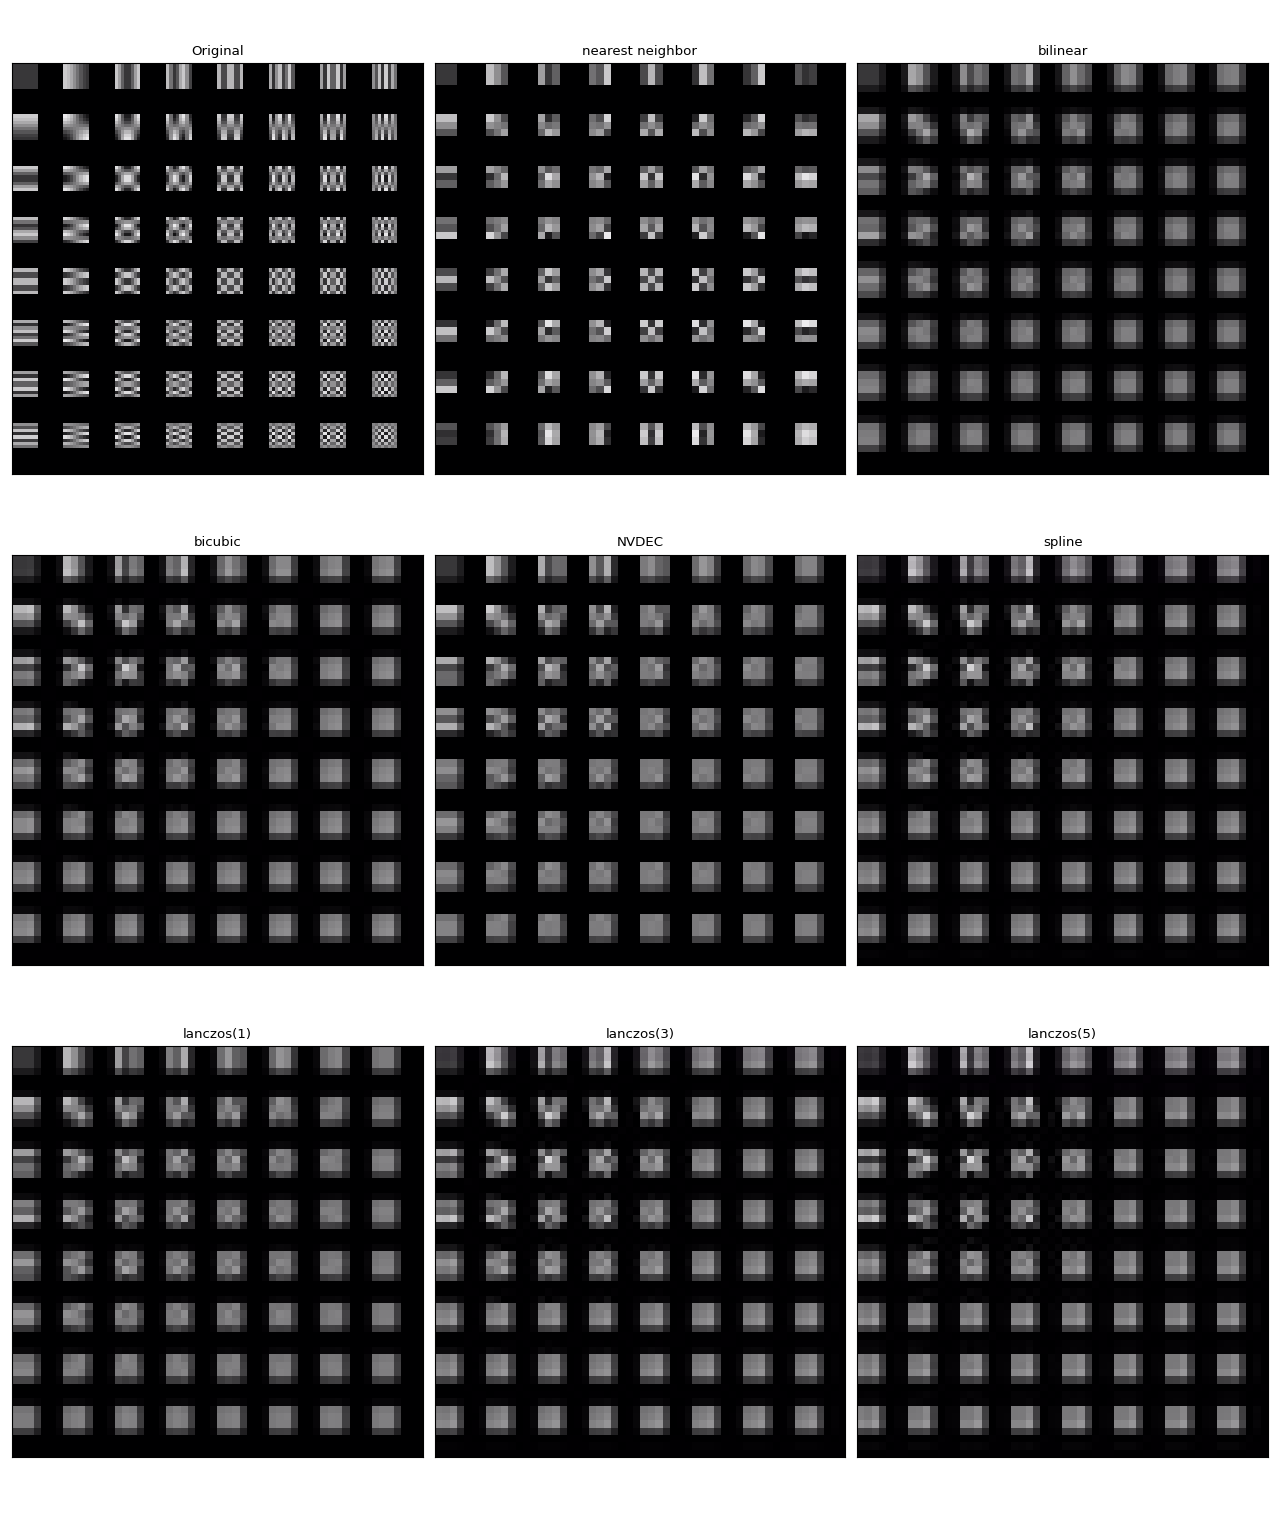
它们都不完全相同。在作者看来,lanczos(1) 似乎与 NVDEC 最为相似。 双三次插值看起来也相当接近。
使用StreamReader对NVDEC进行基准测试
在本节中,我们将比较软件视频解码和硬件视频解码的性能。
以CUDA帧解码
首先,我们比较软件解码器和硬件编码器解码相同视频所需的时间。 为了使结果具有可比性,使用软件解码器时,我们将得到的张量移动到 CUDA。
测试过程看起来如下所示
使用硬件解码器并将数据直接放置在 CUDA 上
使用软件解码器,生成CPU张量并将其移动到CUDA。
以下函数实现了硬件解码器的测试用例。
def test_decode_cuda(src, decoder, hw_accel="cuda", frames_per_chunk=5):
    s = StreamReader(src)
    s.add_video_stream(frames_per_chunk, decoder=decoder, hw_accel=hw_accel)

    num_frames = 0
    chunk = None
    t0 = time.monotonic()
    for (chunk,) in s.stream():
        num_frames += chunk.shape[0]
    elapsed = time.monotonic() - t0
    print(f" - Shape: {chunk.shape}")
    fps = num_frames / elapsed
    print(f" - Processed {num_frames} frames in {elapsed:.2f} seconds. ({fps:.2f} fps)")
    return fps
以下函数实现了软件解码器的测试用例。
def test_decode_cpu(src, threads, decoder=None, frames_per_chunk=5):
    s = StreamReader(src)
    s.add_video_stream(frames_per_chunk, decoder=decoder, decoder_option={"threads": f"{threads}"})

    num_frames = 0
    device = torch.device("cuda")
    t0 = time.monotonic()
    for i, (chunk,) in enumerate(s.stream()):
        if i == 0:
            print(f" - Shape: {chunk.shape}")
        num_frames += chunk.shape[0]
        chunk = chunk.to(device)
    elapsed = time.monotonic() - t0
    fps = num_frames / elapsed
    print(f" - Processed {num_frames} frames in {elapsed:.2f} seconds. ({fps:.2f} fps)")
    return fps
对于每种视频分辨率,我们使用不同数量的线程运行多个软件解码器测试用例。
def run_decode_tests(src, frames_per_chunk=5):
    fps = []
    print(f"Testing: {os.path.basename(src)}")
    for threads in [1, 4, 8, 16]:
        print(f"* Software decoding (num_threads={threads})")
        fps.append(test_decode_cpu(src, threads))
    print("* Hardware decoding")
    fps.append(test_decode_cuda(src, decoder="h264_cuvid"))
    return fps
现在我们用不同分辨率的视频运行测试。
QVGA
  0%|          | 0.00/1.06M [00:00<?, ?B/s]
100%|##########| 1.06M/1.06M [00:00<00:00, 238MB/s]
Testing: testsrc2_qvga.h264.mp4
* Software decoding (num_threads=1)
 - Shape: torch.Size([5, 3, 240, 320])
 - Processed 900 frames in 0.48 seconds. (1866.15 fps)
* Software decoding (num_threads=4)
 - Shape: torch.Size([5, 3, 240, 320])
 - Processed 900 frames in 0.29 seconds. (3065.56 fps)
* Software decoding (num_threads=8)
 - Shape: torch.Size([5, 3, 240, 320])
 - Processed 900 frames in 0.31 seconds. (2880.67 fps)
* Software decoding (num_threads=16)
 - Shape: torch.Size([5, 3, 240, 320])
 - Processed 895 frames in 0.32 seconds. (2787.33 fps)
* Hardware decoding
 - Shape: torch.Size([5, 3, 240, 320])
 - Processed 900 frames in 2.02 seconds. (445.41 fps)
VGA
  0%|          | 0.00/3.59M [00:00<?, ?B/s]
100%|##########| 3.59M/3.59M [00:00<00:00, 402MB/s]
Testing: testsrc2_vga.h264.mp4
* Software decoding (num_threads=1)
 - Shape: torch.Size([5, 3, 480, 640])
 - Processed 900 frames in 1.23 seconds. (734.11 fps)
* Software decoding (num_threads=4)
 - Shape: torch.Size([5, 3, 480, 640])
 - Processed 900 frames in 0.61 seconds. (1467.81 fps)
* Software decoding (num_threads=8)
 - Shape: torch.Size([5, 3, 480, 640])
 - Processed 900 frames in 0.67 seconds. (1349.29 fps)
* Software decoding (num_threads=16)
 - Shape: torch.Size([5, 3, 480, 640])
 - Processed 895 frames in 0.69 seconds. (1298.35 fps)
* Hardware decoding
 - Shape: torch.Size([5, 3, 480, 640])
 - Processed 900 frames in 0.35 seconds. (2566.12 fps)
XGA
  0%|          | 0.00/9.22M [00:00<?, ?B/s]
100%|##########| 9.22M/9.22M [00:00<00:00, 489MB/s]
Testing: testsrc2_xga.h264.mp4
* Software decoding (num_threads=1)
 - Shape: torch.Size([5, 3, 768, 1024])
 - Processed 900 frames in 2.72 seconds. (330.36 fps)
* Software decoding (num_threads=4)
 - Shape: torch.Size([5, 3, 768, 1024])
 - Processed 900 frames in 1.30 seconds. (690.70 fps)
* Software decoding (num_threads=8)
 - Shape: torch.Size([5, 3, 768, 1024])
 - Processed 900 frames in 1.18 seconds. (760.67 fps)
* Software decoding (num_threads=16)
 - Shape: torch.Size([5, 3, 768, 1024])
 - Processed 895 frames in 1.16 seconds. (772.86 fps)
* Hardware decoding
 - Shape: torch.Size([5, 3, 768, 1024])
 - Processed 900 frames in 0.62 seconds. (1444.41 fps)
结果
现在我们绘制结果。
def plot():
    fig, ax = plt.subplots(figsize=[9.6, 6.4])

    for items in zip(fps_qvga, fps_vga, fps_xga, "ov^sx"):
        ax.plot(items[:-1], marker=items[-1])
    ax.grid(axis="both")
    ax.set_xticks([0, 1, 2], ["QVGA (320x240)", "VGA (640x480)", "XGA (1024x768)"])
    ax.legend(
        [
            "Software Decoding (threads=1)",
            "Software Decoding (threads=4)",
            "Software Decoding (threads=8)",
            "Software Decoding (threads=16)",
            "Hardware Decoding (CUDA Tensor)",
        ]
    )
    ax.set_title("Speed of processing video frames")
    ax.set_ylabel("Frames per second")
    plt.tight_layout()


plot()
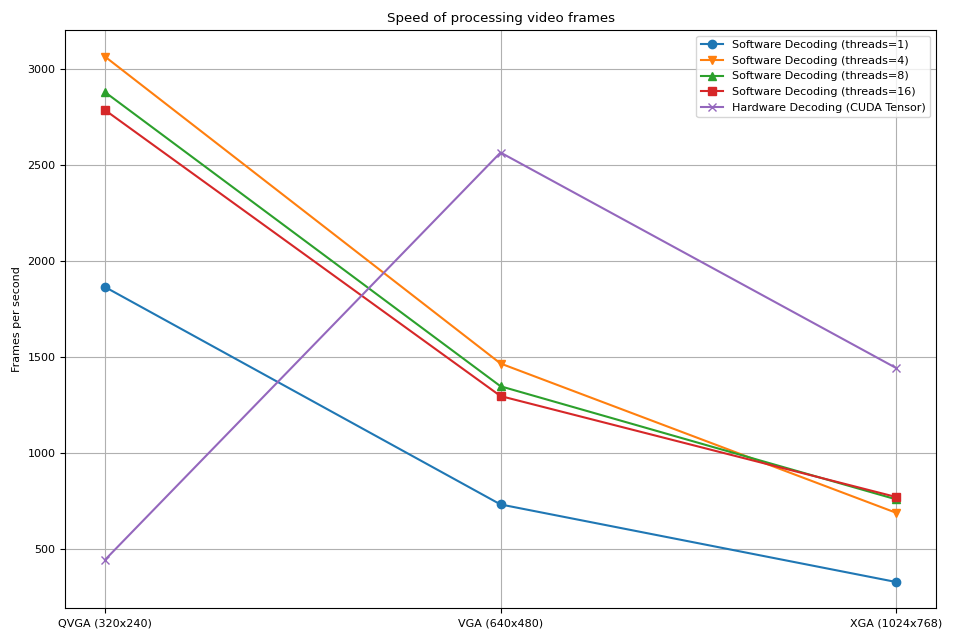
我们注意到几点事情
增加软件解码中的线程数会使流水线更快,但性能在大约 8 个线程时趋于饱和。
使用硬件解码器带来的性能提升取决于视频的分辨率。
在较低的分辨率如 QVGA 下,硬件解码比软件解码要慢
在更高分辨率如XGA的情况下,硬件解码比软件解码更快。
值得注意的是,性能提升也取决于GPU的类型。 我们观察到,当使用V100或A100 GPU解码VGA视频时, 硬件解码器比软件解码器更慢。但使用A10 GPU的硬件解码器比软件解码器更快。
解码并调整大小
接下来,我们将向流程中添加调整大小操作。 我们将比较以下流程。
使用软件解码器解码视频并以 PyTorch Tensor 的形式读取帧。使用
torch.nn.functional.interpolate()对张量进行缩放,然后将结果张量发送到 CUDA 设备。使用软件解码器解码视频,通过 FFmpeg 的滤镜图调整帧的大小,将调整大小后的帧读取为 PyTorch 张量,然后将其发送到 CUDA 设备。
使用硬件解码器同时解码并调整视频大小,将得到的帧读取为 CUDA 张量。
管道 1 表示常见的视频加载实现。
管道 2 使用了 FFmpeg 的滤镜图,这允许在将帧转换为张量之前对原始帧进行操作。
流水线 3 从 CPU 到 CUDA 的数据传输量最少,这显著提高了数据加载的性能。
以下函数实现了流程 1。它使用了 PyTorch 的
torch.nn.functional.interpolate()。
我们使用 bincubic 模式,因为我们发现生成的帧最接近 NVDEC 缩放效果。
def test_decode_then_resize(src, height, width, mode="bicubic", frames_per_chunk=5):
    s = StreamReader(src)
    s.add_video_stream(frames_per_chunk, decoder_option={"threads": "8"})

    num_frames = 0
    device = torch.device("cuda")
    chunk = None
    t0 = time.monotonic()
    for (chunk,) in s.stream():
        num_frames += chunk.shape[0]
        chunk = torch.nn.functional.interpolate(chunk, [height, width], mode=mode, antialias=True)
        chunk = chunk.to(device)
    elapsed = time.monotonic() - t0
    fps = num_frames / elapsed
    print(f" - Shape: {chunk.shape}")
    print(f" - Processed {num_frames} frames in {elapsed:.2f} seconds. ({fps:.2f} fps)")
    return fps
以下函数实现了流程 2。帧在解码过程中被调整大小,然后发送到 CUDA 设备。
我们使用 bincubic 模式,使结果与上面基于 PyTorch 的实现具有可比性。
def test_decode_and_resize(src, height, width, mode="bicubic", frames_per_chunk=5):
    s = StreamReader(src)
    s.add_video_stream(
        frames_per_chunk, filter_desc=f"scale={width}:{height}:sws_flags={mode}", decoder_option={"threads": "8"}
    )

    num_frames = 0
    device = torch.device("cuda")
    chunk = None
    t0 = time.monotonic()
    for (chunk,) in s.stream():
        num_frames += chunk.shape[0]
        chunk = chunk.to(device)
    elapsed = time.monotonic() - t0
    fps = num_frames / elapsed
    print(f" - Shape: {chunk.shape}")
    print(f" - Processed {num_frames} frames in {elapsed:.2f} seconds. ({fps:.2f} fps)")
    return fps
以下函数实现了流程 3。缩放由 NVDEC 执行,生成的张量被放置在 CUDA 内存中。
def test_hw_decode_and_resize(src, decoder, decoder_option, hw_accel="cuda", frames_per_chunk=5):
    s = StreamReader(src)
    s.add_video_stream(5, decoder=decoder, decoder_option=decoder_option, hw_accel=hw_accel)

    num_frames = 0
    chunk = None
    t0 = time.monotonic()
    for (chunk,) in s.stream():
        num_frames += chunk.shape[0]
    elapsed = time.monotonic() - t0
    fps = num_frames / elapsed
    print(f" - Shape: {chunk.shape}")
    print(f" - Processed {num_frames} frames in {elapsed:.2f} seconds. ({fps:.2f} fps)")
    return fps
以下函数在给定的源上运行基准测试函数。
def run_resize_tests(src):
    print(f"Testing: {os.path.basename(src)}")
    height, width = 224, 224
    print("* Software decoding with PyTorch interpolate")
    cpu_resize1 = test_decode_then_resize(src, height=height, width=width)
    print("* Software decoding with FFmpeg scale")
    cpu_resize2 = test_decode_and_resize(src, height=height, width=width)
    print("* Hardware decoding with resize")
    cuda_resize = test_hw_decode_and_resize(src, decoder="h264_cuvid", decoder_option={"resize": f"{width}x{height}"})
    return [cpu_resize1, cpu_resize2, cuda_resize]
现在我们运行测试。
QVGA
Testing: testsrc2_qvga.h264.mp4
* Software decoding with PyTorch interpolate
 - Shape: torch.Size([5, 3, 224, 224])
 - Processed 900 frames in 0.66 seconds. (1369.15 fps)
* Software decoding with FFmpeg scale
 - Shape: torch.Size([5, 3, 224, 224])
 - Processed 900 frames in 0.35 seconds. (2539.40 fps)
* Hardware decoding with resize
 - Shape: torch.Size([5, 3, 224, 224])
 - Processed 900 frames in 2.02 seconds. (444.75 fps)
VGA
Testing: testsrc2_vga.h264.mp4
* Software decoding with PyTorch interpolate
 - Shape: torch.Size([5, 3, 224, 224])
 - Processed 900 frames in 1.49 seconds. (603.84 fps)
* Software decoding with FFmpeg scale
 - Shape: torch.Size([5, 3, 224, 224])
 - Processed 900 frames in 0.58 seconds. (1556.54 fps)
* Hardware decoding with resize
 - Shape: torch.Size([5, 3, 224, 224])
 - Processed 900 frames in 0.35 seconds. (2571.51 fps)
XGA
Testing: testsrc2_xga.h264.mp4
* Software decoding with PyTorch interpolate
 - Shape: torch.Size([5, 3, 224, 224])
 - Processed 900 frames in 2.91 seconds. (309.72 fps)
* Software decoding with FFmpeg scale
 - Shape: torch.Size([5, 3, 224, 224])
 - Processed 900 frames in 0.97 seconds. (924.73 fps)
* Hardware decoding with resize
 - Shape: torch.Size([5, 3, 224, 224])
 - Processed 900 frames in 0.62 seconds. (1455.58 fps)
结果
现在我们绘制结果。
def plot():
    fig, ax = plt.subplots(figsize=[9.6, 6.4])

    for items in zip(fps_qvga, fps_vga, fps_xga, "ov^sx"):
        ax.plot(items[:-1], marker=items[-1])
    ax.grid(axis="both")
    ax.set_xticks([0, 1, 2], ["QVGA (320x240)", "VGA (640x480)", "XGA (1024x768)"])
    ax.legend(
        [
            "Software decoding\nwith resize\n(PyTorch interpolate)",
            "Software decoding\nwith resize\n(FFmpeg scale)",
            "NVDEC\nwith resizing",
        ]
    )
    ax.set_title("Speed of processing video frames")
    ax.set_xlabel("Input video resolution")
    ax.set_ylabel("Frames per second")
    plt.tight_layout()


plot()
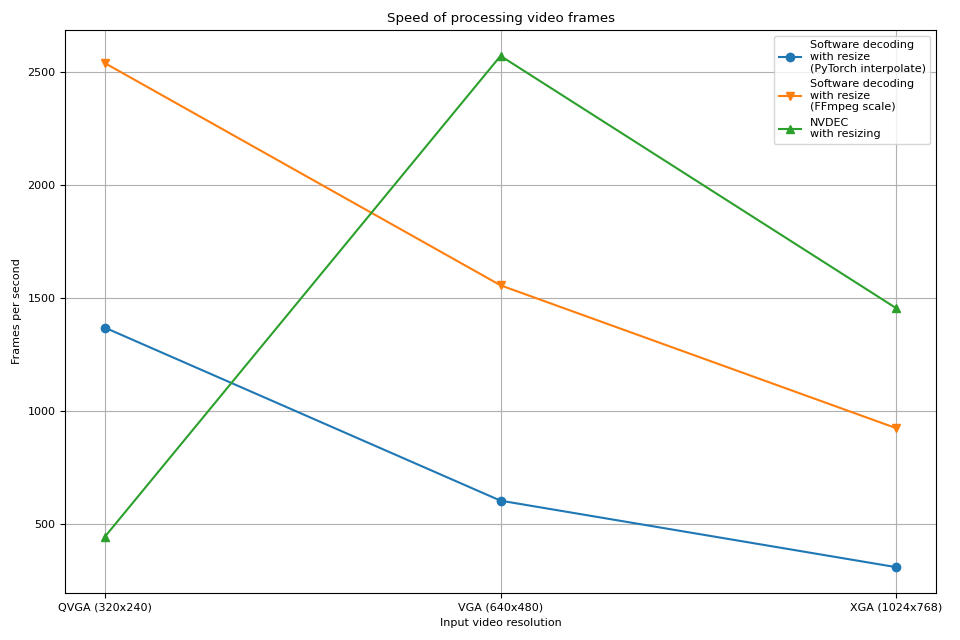
硬件解码器的表现趋势与之前的实验类似。 实际上,性能几乎相同。硬件缩放在缩小帧时的开销几乎为零。
软件解码也表现出类似的趋势。将调整大小作为解码的一部分进行,速度更快。一个可能的解释是,视频帧在内部以 YUV420P 格式存储,其像素数量是 RGB24 或 YUV444P 的一半。这意味着,如果在将帧数据复制到 PyTorch 张量之前进行调整大小,所操作和复制的像素数量会比在帧转换为张量之后进行调整大小的情况更少。
Tag: torchaudio.io
脚本的总运行时间: ( 0 分钟 30.258 秒)